Spring
Spring
spring是一个开源的容器
轻量级、非入侵的框架
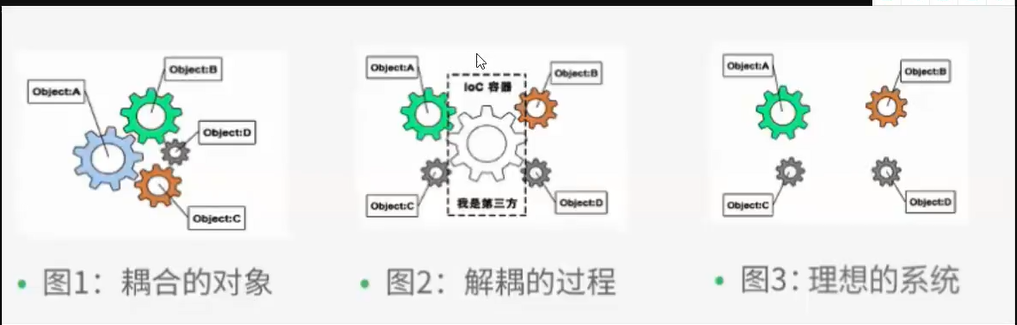
控制反转(IOC) 和面向切面编程(AOP)
IOC(控制反转)推导
package com.zero.Dao;

public interface UserDao {
    void getUser();
}
package com.zero.Dao;

public class UserDaoImpl implements UserDao{
    @Override
    public void getUser() {
        System.out.println("获取默认数据");
    }
}
package com.zero.Dao;

public class UsermysqlImpl implements UserDao{
    @Override
    public void getUser() {
        System.out.println("mysql数据");
    }
}
package com.zero.Dao;

public class UserOracleImpl implements UserDao{
    @Override
    public void getUser() {
        System.out.println("Oracle数据");
    }
}
package com.zero.service;

public interface UserService {
    void getUser();
}
package com.zero.service;
import com.zero.Dao.UserDao;
import com.zero.Dao.UserDaoImpl;
import com.zero.Dao.UserOracleImpl;
import com.zero.Dao.UsermysqlImpl;
public class UserServiceImpl implements UserService{
public UserDao userDao = new UsermysqlImpl();
@Override
public void getUser() {
userDao.getUser();
}
}import com.zero.service.UserServiceImpl;
public class execute {
public static void main(String[] args) {
UserServiceImpl userService = new UserServiceImpl();
userService.getUser();
}
}
package com.zero.service;

import com.zero.Dao.UserDao;

public interface UserService {
    void setUser(UserDao userDao);
    void getUser();
}
package com.zero.service;
import com.zero.Dao.UserDao;
import com.zero.Dao.UserDaoImpl;
import com.zero.Dao.UserOracleImpl;
import com.zero.Dao.UsermysqlImpl;
public class UserServiceImpl implements UserService{
public UserDao userDao;
@Override
public void setUser(UserDao userDao) {
this.userDao = userDao;
}
@Override
public void getUser() {
userDao.getUser();
}
}import com.zero.Dao.UserOracleImpl;
import com.zero.service.UserServiceImpl;
public class execute {
public static void main(String[] args) {
UserServiceImpl userService = new UserServiceImpl();
UserOracleImpl userOracle = new UserOracleImpl();
userService.setUser(userOracle);
userService.getUser();
}
}使用set注入,控制权不在程序员手上,程序只能被动地接受对象
程序员不用再去管理对象的创建
HelloSpring
通过xml配置文件修改
对象由spring来创建,管理、装配
package com.zero;

public class person {
    private String str;

    public String getStr() {
        return str;
    }

    public void setStr(String str) {
        this.str = str;
    }

    @Override
    public String toString() {
        return "person{" +
                "str='" + str + '\'' +
                '}';
    }
}
<?xml version="1.0" encoding="UTF-8"?>
<beans xmlns="http://www.springframework.org/schema/beans"
xmlns:xsi="http://www.w3.org/2001/XMLSchema-instance"
xsi:schemaLocation="http://www.springframework.org/schema/beans
https://www.springframework.org/schema/beans/spring-beans.xsd">
<bean id="mysql" class="com.zero.Dao.UsermysqlImpl"></bean>
<bean id = "oracle" class="com.zero.Dao.UserOracleImpl"></bean>
<bean id = "service" class="com.zero.service.UserServiceImpl">
<property name="user" ref="mysql"></property> //这个name不是属性的名字,而是那个属性对应的set方法的名字,例如我这里set方法就是setUser
</bean>
<bean id="person" class="com.zero.person">
<property name="str" value="zeropeach"></property>
</bean>
</beans>import com.zero.Dao.UserOracleImpl;
import com.zero.person;
import com.zero.service.UserService;
import com.zero.service.UserServiceImpl;
import org.springframework.context.ApplicationContext;
import org.springframework.context.support.ClassPathXmlApplicationContext;
public class execute {
public static void main(String[] args) {
ApplicationContext classPathXmlApplicationContext = new ClassPathXmlApplicationContext("bean.xml");
UserService service = (UserService)classPathXmlApplicationContext.getBean("service");
person person = (person) classPathXmlApplicationContext.getBean("person");
service.getUser();
System.out.println(person.toString());
}
}IOC有参构造创建对象方式
上面默认是无参构造实例化,那若是一个有参的构造函数呢
package com.zero.pojo;

public class User {
    private String user;

    public User(String user) {
        this.user = user;
    }

    @Override
    public String toString() {
        return "User{" +
                "user='" + user + '\'' +
                '}';
    }

    public String getUser() {
        return user;
    }

    public void setUser(String user) {
        this.user = user;
    }
}
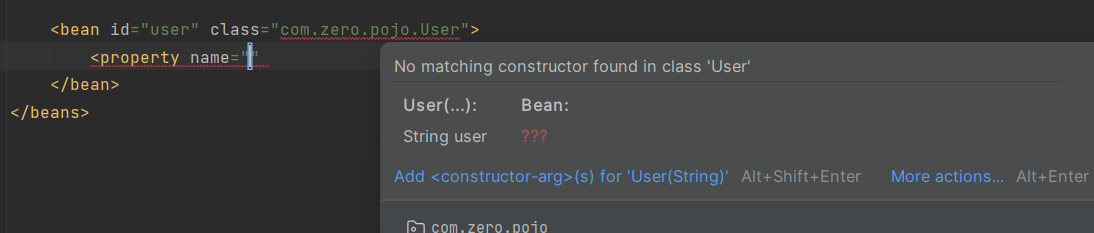
提示要使用<constructor-arg>标签
方式一 通过类型 不推荐
这种方法有瑕疵,就是万一2个形参都是一样的类型就没办法了
<?xml version="1.0" encoding="UTF-8"?>
<beans xmlns="http://www.springframework.org/schema/beans"
       xmlns:xsi="http://www.w3.org/2001/XMLSchema-instance"
       xsi:schemaLocation="http://www.springframework.org/schema/beans
        https://www.springframework.org/schema/beans/spring-beans.xsd">


    <bean id="user" class="com.zero.pojo.User">
        <constructor-arg type="java.lang.String" value="zeropeach"></constructor-arg>
    </bean>
</beans>
import com.zero.Dao.UserOracleImpl;
import com.zero.person;
import com.zero.pojo.User;
import com.zero.service.UserService;
import com.zero.service.UserServiceImpl;
import org.springframework.context.ApplicationContext;
import org.springframework.context.support.ClassPathXmlApplicationContext;
public class execute {
public static void main(String[] args) {
ApplicationContext classPathXmlApplicationContext = new ClassPathXmlApplicationContext("bean.xml");
User user = (User) classPathXmlApplicationContext.getBean("user");
System.out.println(user.toString());
}
}方式二 下标索引
<?xml version="1.0" encoding="UTF-8"?>
<beans xmlns="http://www.springframework.org/schema/beans"
       xmlns:xsi="http://www.w3.org/2001/XMLSchema-instance"
       xsi:schemaLocation="http://www.springframework.org/schema/beans
        https://www.springframework.org/schema/beans/spring-beans.xsd">


    <bean id="user" class="com.zero.pojo.User">
        <constructor-arg index="0" value="zeropeach"></constructor-arg>
    </bean>
</beans>
方式三 名字
<?xml version="1.0" encoding="UTF-8"?>
<beans xmlns="http://www.springframework.org/schema/beans"
       xmlns:xsi="http://www.w3.org/2001/XMLSchema-instance"
       xsi:schemaLocation="http://www.springframework.org/schema/beans
        https://www.springframework.org/schema/beans/spring-beans.xsd">


    <bean id="user" class="com.zero.pojo.User">
        <constructor-arg name="user" value="zeropeach"></constructor-arg>
    </bean>
</beans>
什么时候实例化
package com.zero.pojo;

public class spider {
    public spider(){
        System.out.println("i am spider");
    }
}
package com.zero.pojo;
public class black {
public black(){
System.out.println("i am black");
}
}<?xml version="1.0" encoding="UTF-8"?>
<beans xmlns="http://www.springframework.org/schema/beans"
xmlns:xsi="http://www.w3.org/2001/XMLSchema-instance"
xsi:schemaLocation="http://www.springframework.org/schema/beans
https://www.springframework.org/schema/beans/spring-beans.xsd">
<bean id="black" class="com.zero.pojo.black"></bean>
<bean id="spider" class="com.zero.pojo.spider"></bean>
<bean id="user" class="com.zero.pojo.User">
<constructor-arg name="user" value="zeropeach"></constructor-arg>
</bean>
</beans>import com.zero.Dao.UserOracleImpl;
import com.zero.person;
import com.zero.pojo.User;
import com.zero.service.UserService;
import com.zero.service.UserServiceImpl;
import org.springframework.context.ApplicationContext;
import org.springframework.context.support.ClassPathXmlApplicationContext;
public class execute {
public static void main(String[] args) {
ApplicationContext classPathXmlApplicationContext = new ClassPathXmlApplicationContext("bean.xml");
User user = (User) classPathXmlApplicationContext.getBean("user");
System.out.println(user.toString());
}
}并没有getBean获取black和spider,但却输出了
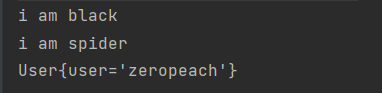
说明spring在读取beans.xml的时候就实例化了所有beans.xml中注册的类
spring配置
别名 alias
<bean id="user" class="com.zero.pojo.User">
	<constructor-arg name="user" value="zeropeach"></constructor-arg>
</bean>

<alias name="user" alias="user2"></alias>
ApplicationContext classPathXmlApplicationContext = new ClassPathXmlApplicationContext("bean.xml");

User user = (User) classPathXmlApplicationContext.getBean("user2");
System.out.println(user.toString());
bean
bean中本身就有name属性,更加高级,可以用空格、逗号、分号、
<bean id="user" class="com.zero.pojo.User" name="user2 user3,user4;user5">
	<constructor-arg name="user" value="zeropeach"></constructor-arg>
</bean>
import
<?xml version="1.0" encoding="UTF-8"?>
<beans xmlns="http://www.springframework.org/schema/beans"
       xmlns:xsi="http://www.w3.org/2001/XMLSchema-instance"
       xsi:schemaLocation="http://www.springframework.org/schema/beans
        https://www.springframework.org/schema/beans/spring-beans.xsd">


    <import resource="bean.xml"></import>

</beans>
依赖注入
构造器注入
set方式注入
<?xml version="1.0" encoding="UTF-8"?>
<beans xmlns="http://www.springframework.org/schema/beans"
       xmlns:xsi="http://www.w3.org/2001/XMLSchema-instance"
       xsi:schemaLocation="http://www.springframework.org/schema/beans
        https://www.springframework.org/schema/beans/spring-beans.xsd">

    <bean id="address" class="com.zero.pojo.Address">
        <property name="address" value="广州"></property>
    </bean>

   <bean id="student" class="com.zero.pojo.Student">
       <property name="name" value="zeropeach"></property>

       <property name="address" ref="address"></property>

       <property name="books">
           <array>
               <value>西游记</value>
               <value>三国演义</value>
               <value>水浒传</value>
               <value>红楼梦</value>
           </array>
       </property>
       <property name="card">
           <map>
               <entry key="aa" value="aaaaaaa"></entry>
               <entry key="bb" value="bbb"></entry>
               <entry key="cc" value="acccaaa"></entry>
               <entry key="dd" value="add"></entry>
           </map>
       </property>
       <property name="games">
           <set>
               <value>LOL</value>
               <value>BOB</value>
               <value>COC</value>
           </set>
       </property>
       <property name="hobbys">
           <list>
               <value>听歌</value>
               <value>代码</value>
               <value>电影</value>
           </list>
       </property>
       <property name="wife">
           <null></null>
       </property>

       <property name="info">
           <props>
               <prop key="银行卡">1231231231223123</prop>
               <prop key="学号">12312312312</prop>
           </props>
       </property>
   </bean>

</beans>
命名空间注入
//在beans中加入命名空间

xmlns:p="http://www.springframework.org/schema/p"
xmlns:c="http://www.springframework.org/schema/c"
<?xml version="1.0" encoding="UTF-8"?>
<beans xmlns="http://www.springframework.org/schema/beans"
xmlns:xsi="http://www.w3.org/2001/XMLSchema-instance"
xmlns:p="http://www.springframework.org/schema/p"
xmlns:c="http://www.springframework.org/schema/c"
xsi:schemaLocation="http://www.springframework.org/schema/beans
https://www.springframework.org/schema/beans/spring-beans.xsd">
<!--properties-->
<bean id="user" class="com.zero.pojo.User" p:name="zeropeach" p:age="19"></bean>
<!--constructor-arg-->
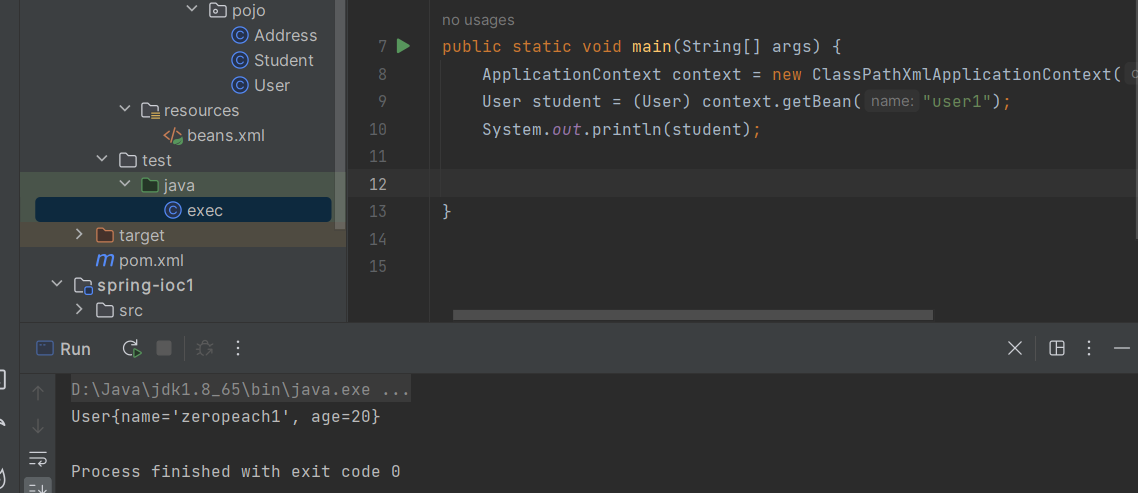
<bean id="user1" class="com.zero.pojo.User" c:name="zeropeach1" c:age="20"></bean>
</beans>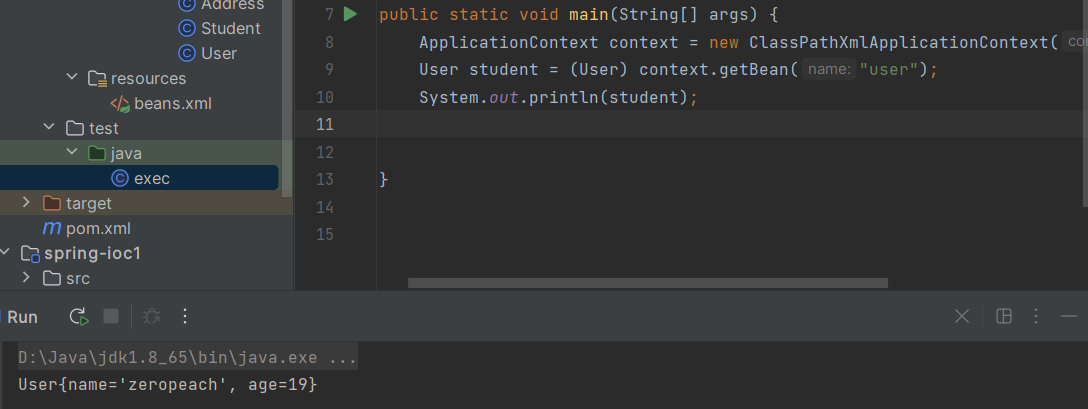
bean的作用域
- 单例模式
<bean id="user" class="com.zero.pojo.User" p:name="zeropeach" p:age="19" scope="singleton"></bean>- 原型模式:每次从容器中getBean的时候都会产生一个新对象
<bean id="user1" class="com.zero.pojo.User" c:name="zeropeach1" c:age="20" scope="prototype"></bean><?xml version="1.0" encoding="UTF-8"?>
<beans xmlns="http://www.springframework.org/schema/beans"
xmlns:xsi="http://www.w3.org/2001/XMLSchema-instance"
xmlns:p="http://www.springframework.org/schema/p"
xmlns:c="http://www.springframework.org/schema/c"
xsi:schemaLocation="http://www.springframework.org/schema/beans
https://www.springframework.org/schema/beans/spring-beans.xsd">
<!--单例模式-->
<bean id="user" class="com.zero.pojo.User" p:name="zeropeach" p:age="19" scope="singleton"></bean>
<!--原型模式-->
<bean id="user1" class="com.zero.pojo.User" c:name="zeropeach1" c:age="20" scope="prototype"></bean>
</beans>import com.zero.pojo.Student;
import com.zero.pojo.User;
import org.springframework.context.ApplicationContext;
import org.springframework.context.support.ClassPathXmlApplicationContext;
public class exec {
public static void main(String[] args) {
ApplicationContext context = new ClassPathXmlApplicationContext("beans.xml");
User student = (User) context.getBean("user");
User student1 = (User) context.getBean("user");
System.out.println(student.hashCode());
System.out.println(student1.hashCode());
System.out.println(student==student1);
User user1 = (User) context.getBean("user1");
User user2 = (User) context.getBean("user1");
System.out.println(user1.hashCode());
System.out.println(user2.hashCode());
System.out.println(user1==user2);
}
}
- 其他的在web服务中用
bean的自动装配
package com.zero.pojo;

public class people {
    private Dog dog;
    private Cat cat;
    private String name;

    @Override
    public String toString() {
        return "people{" +
                "dog=" + dog +
                ", cat=" + cat +
                ", name='" + name + '\'' +
                '}';
    }

    public Dog getDog() {
        return dog;
    }

    public void setDog(Dog dog) {
        this.dog = dog;
    }

    public Cat getCat() {
        return cat;
    }

    public void setCat(Cat cat) {
        this.cat = cat;
    }

    public String getName() {
        return name;
    }

    public void setName(String name) {
        this.name = name;
    }
}
ByName自动装配
<!--自动在容器上下文中查找,和自己对象set方法后面的值对应的beanid-->
<!--并且id要是小写-->

<bean id="dog" class="com.zero.pojo.Dog"></bean>
<bean id="cat" class="com.zero.pojo.Cat"></bean>


<bean id="people" class="com.zero.pojo.people" autowire="byName">
    <property name="name" value="zeropeach"></property>
</bean>
ByType自动装配
<bean class="com.zero.pojo.Dog"></bean>
<bean class="com.zero.pojo.Cat"></bean>

<!--自动寻找相同的class-->
<bean id="people1" class="com.zero.pojo.people" autowire="byType">
    <property name="name" value="zeropeach"></property>
</bean>
总结
byname要保证所有bean的id唯一并且这个bean需要和自动注入的属性的set方法的值一致
bytype要保证所有bean的class唯一,并且这个bean需要和自动注入的属性的类型一致
使用注解进行自动装配
@Autowired和@Qualifier
使用@Qualifier配合使用
增加
xmlns:context="http://www.springframework.org/schema/context"
xmlns:aop="http://www.springframework.org/schema/aop"


 http://www.springframework.org/schema/context
 https://www.springframework.org/schema/context/spring-context.xsd
 http://www.springframework.org/schema/aop
 https://www.springframework.org/schema/aop/spring-aop.xsd
关键别忘了 <context:annotation-config/>,开启注释
<?xml version="1.0" encoding="UTF-8"?>
<beans xmlns="http://www.springframework.org/schema/beans"
       xmlns:xsi="http://www.w3.org/2001/XMLSchema-instance"
       xmlns:context="http://www.springframework.org/schema/context"
       xmlns:aop="http://www.springframework.org/schema/aop"
       xsi:schemaLocation="http://www.springframework.org/schema/beans
        https://www.springframework.org/schema/beans/spring-beans.xsd
        http://www.springframework.org/schema/context
        https://www.springframework.org/schema/context/spring-context.xsd
        http://www.springframework.org/schema/aop
        https://www.springframework.org/schema/aop/spring-aop.xsd">
    <context:annotation-config></context:annotation-config>


    <bean id="dog1" class="com.zero.pojo.Dog"></bean>

    <bean id="cat1" class="com.zero.pojo.Cat"></bean>

    <bean id="people" class="com.zero.pojo.people"></bean>


</beans>
package com.zero.pojo;
import org.springframework.beans.factory.annotation.Autowired;
import org.springframework.beans.factory.annotation.Qualifier;
public class people {
@Autowired(required = false) //说明可以为空
private Dog dog;
@Autowired
private Cat cat;
private String name;
......get和set方法
}如果@Autowired自动装配的环境比较复杂,自动装配无法通过一个注解完成的时候,可以使用@Qualifier配合使用
<bean id="dog1" class="com.zero.pojo.Dog"></bean>
<bean id="dog2" class="com.zero.pojo.Dog"></bean>
<bean id="cat1" class="com.zero.pojo.Cat"></bean>
<bean id="cat2" class="com.zero.pojo.Cat"></bean>
<bean id="people" class="com.zero.pojo.people"></bean>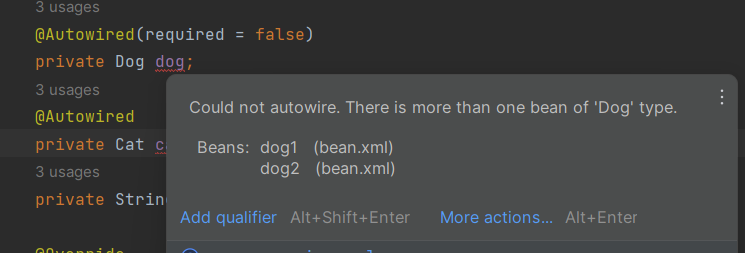
package com.zero.pojo;

import org.springframework.beans.factory.annotation.Autowired;
import org.springframework.beans.factory.annotation.Qualifier;

public class people {
    @Autowired(required = false)
    @Qualifier(value = "dog1")
    private Dog dog;
    @Autowired
    @Qualifier(value = "cat1")
    private Cat cat;
    private String name;


。。。。。
}
@Resource
<?xml version="1.0" encoding="UTF-8"?>
<beans xmlns="http://www.springframework.org/schema/beans"
       xmlns:xsi="http://www.w3.org/2001/XMLSchema-instance"
       xmlns:context="http://www.springframework.org/schema/context"
       xmlns:aop="http://www.springframework.org/schema/aop"
       xsi:schemaLocation="http://www.springframework.org/schema/beans
        https://www.springframework.org/schema/beans/spring-beans.xsd
        http://www.springframework.org/schema/context
        https://www.springframework.org/schema/context/spring-context.xsd
        http://www.springframework.org/schema/aop
        https://www.springframework.org/schema/aop/spring-aop.xsd">
    <context:annotation-config></context:annotation-config>

    <bean id="dog" class="com.zero.pojo.Dog"></bean>

    <bean id="cat" class="com.zero.pojo.Cat"></bean>

    <bean id="people" class="com.zero.pojo.people"></bean>


</beans>
package com.zero.pojo;
import javax.annotation.Resource;
public class people {
@Resource(name = "dog")
private Dog dog;
@Resource(name = "cat")
private Cat cat;
private String name;
}小结:
@Autowired通过ByType方式实现,而且必须要求这个对象存在
@Resource默认通过ByName方式实现,如果找不到名字,则通过byType实现,都找不到再报错
使用注解开发
Component注解
使用Compnent注解相当于在配置文件中加入<bean class="com.zero.pojo.User" id="user"/>
于是配置文件中就可以不用注册bean了,只需要允许component注解即可
<context:component-scan base-package="com.zero"></context:component-scan><?xml version="1.0" encoding="UTF-8"?>
<beans xmlns="http://www.springframework.org/schema/beans"
xmlns:xsi="http://www.w3.org/2001/XMLSchema-instance"
xmlns:context="http://www.springframework.org/schema/context"
xmlns:aop="http://www.springframework.org/schema/aop"
xsi:schemaLocation="http://www.springframework.org/schema/beans
https://www.springframework.org/schema/beans/spring-beans.xsd
http://www.springframework.org/schema/context
https://www.springframework.org/schema/context/spring-context.xsd
http://www.springframework.org/schema/aop
https://www.springframework.org/schema/aop/spring-aop.xsd">
<context:component-scan base-package="com.zero"></context:component-scan>
<context:annotation-config></context:annotation-config>
</beans>@Value注解来赋值
package com.zero.pojo;

import org.springframework.beans.factory.annotation.Value;
import org.springframework.stereotype.Component;

@Component
public class User {
    @Value("zeropeach")
    private String name;
    @Value("19")
    private int age;

    public User() {
    }

    public User(String name, int age) {
        this.name = name;
        this.age = age;
    }

    public String getName() {
        return name;
    }

    public void setName(String name) {
        this.name = name;
    }

    public int getAge() {
        return age;
    }

    public void setAge(int age) {
        this.age = age;
    }

    @Override
    public String toString() {
        return "User{" +
                "name='" + name + '\'' +
                ", age=" + age +
                '}';
    }
}
直接获取小写的类名即可
import com.zero.pojo.Student;
import com.zero.pojo.User;
import com.zero.pojo.people;
import org.springframework.context.ApplicationContext;
import org.springframework.context.support.ClassPathXmlApplicationContext;

public class exec {
    public static void main(String[] args) {
        ApplicationContext context = new ClassPathXmlApplicationContext("bean.xml");

        User people = (User) context.getBean("user");
        System.out.println(people.toString());
    }
}另外component也是可以自定义id的,component("")就可以自定义id的名称
另外与component等效的还有3种注解,另外三种作用一模一样,但是作用场景不同,是用于区分的:
- @Controller 控制器(注入服务)
用于标注控制层,相当于struts中的action层 - @Service 服务(注入dao)
用于标注服务层,主要用来进行业务的逻辑处理 - @Repository(实现dao访问)
用于标注数据访问层,也可以说用于标注数据访问组件,即DAO组件 - @Component (把普通pojo实例化到spring容器中,相当于配置文件中的 )
Scope注解
和上面一样,单例模式和原型模式
@Component("zeero")
@Scope("singleton")
public class User {
    @Value("zeropeach")
    private String name;
    @Value("19")
    private int age;
}
使用java方式配置spring
即不使用xml配置文件
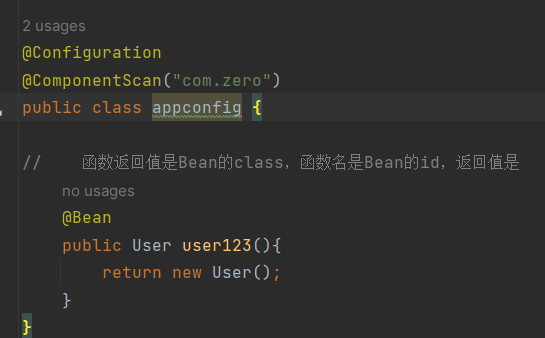
Configuration标签和Bean标签
Configuration标签意思就是<beans>....</beans>大标签
然后使用Bean标签就相当于注册bean
package com.zero.config;

import com.zero.pojo.User;
import org.springframework.context.annotation.Bean;
import org.springframework.context.annotation.Configuration;

@Configuration
public class appconfig {

    @Bean
    public User user123(){
        return new User();
    }
}
函数类型是Bean的class,函数名是Bean的id
下面的Bean注解代表着bean标签,和component的作用是几乎一样的(有些小区别后面会讲)然后这里bean可以通过bean("")指定别名
package com.zero.pojo;

import org.springframework.beans.factory.annotation.Value;
import org.springframework.stereotype.Component;

@Component
public class User {
    @Value("zeropeach")
    private String name;

    public String getName() {
        return name;
    }

    @Override
    public String toString() {
        return "User{" +
                "name='" + name + '\'' +
                '}';
    }

    public void setName(String name) {
        this.name = name;
    }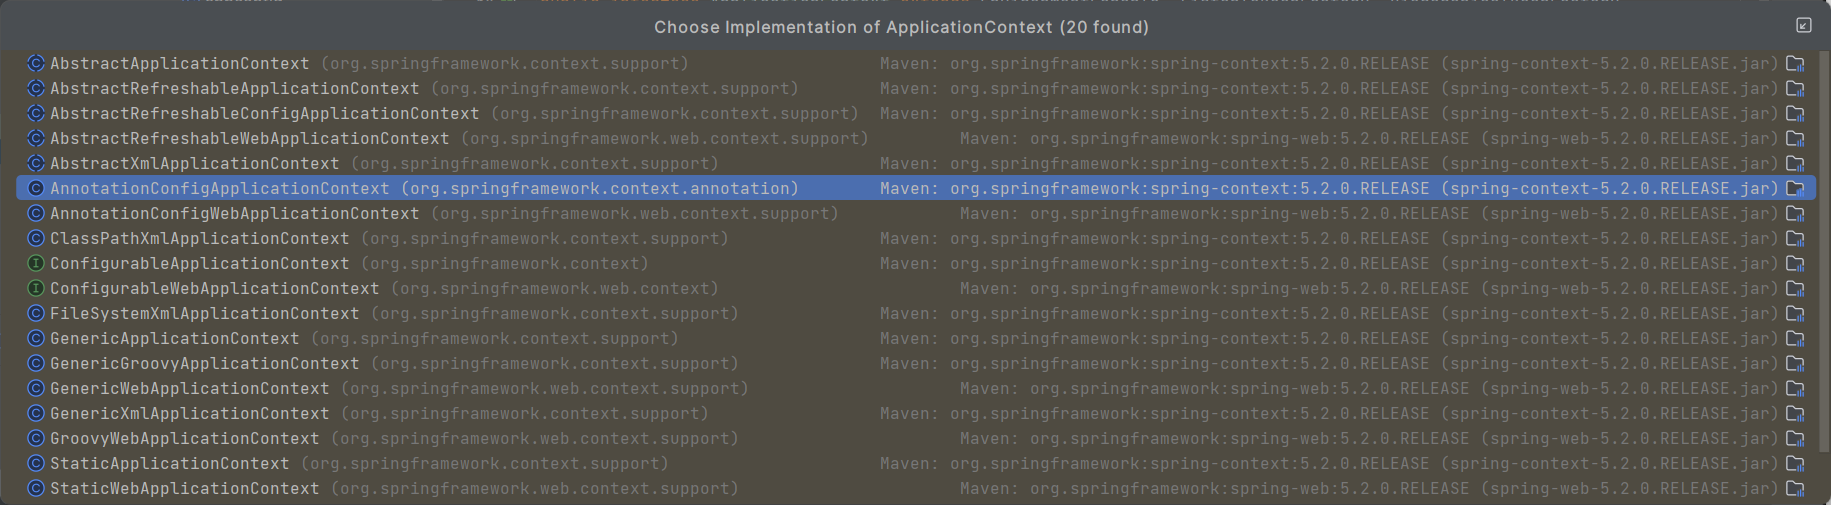
}执行的话,这里要换一个上下文,从ClassPathXmlApplicationContext换为AnnotationConfigApplicationContext
import com.zero.config.appconfig;
import com.zero.pojo.User;
import org.springframework.context.ApplicationContext;
import org.springframework.context.annotation.AnnotationConfigApplicationContext;

public class exec {
    public static void main(String[] args) {
        ApplicationContext context = new AnnotationConfigApplicationContext(appconfig.class);  //获取配置文件的class
        User user = (User) context.getBean("user123");  //函数名
        System.out.println(user.toString());
    }
}
ComponentScan标签
相当于xml配置文件中的<context:component-scan base-package="com.zero"/>
Import标签
导入其他配置类
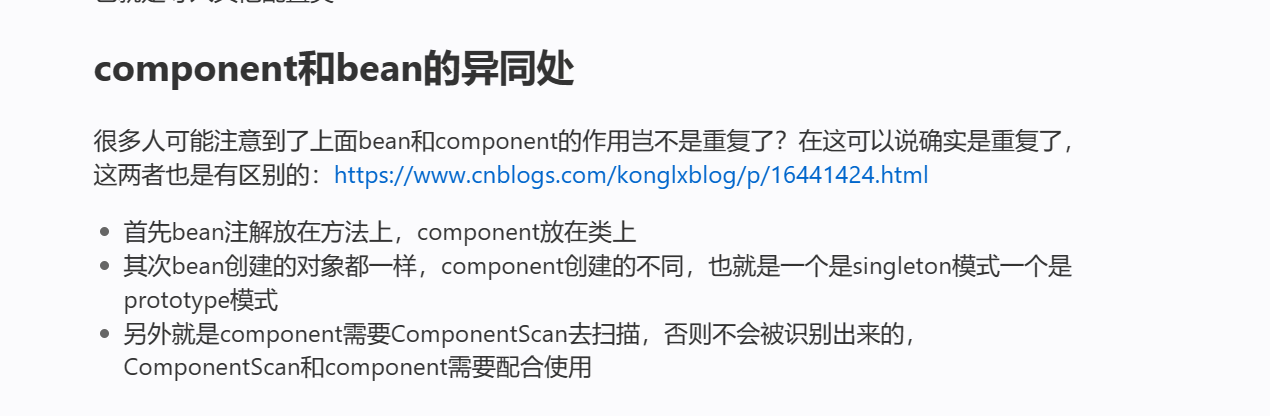
component和bean标签的异同
https://www.cnblogs.com/konglxblog/p/16441424.html
代理
静态代理
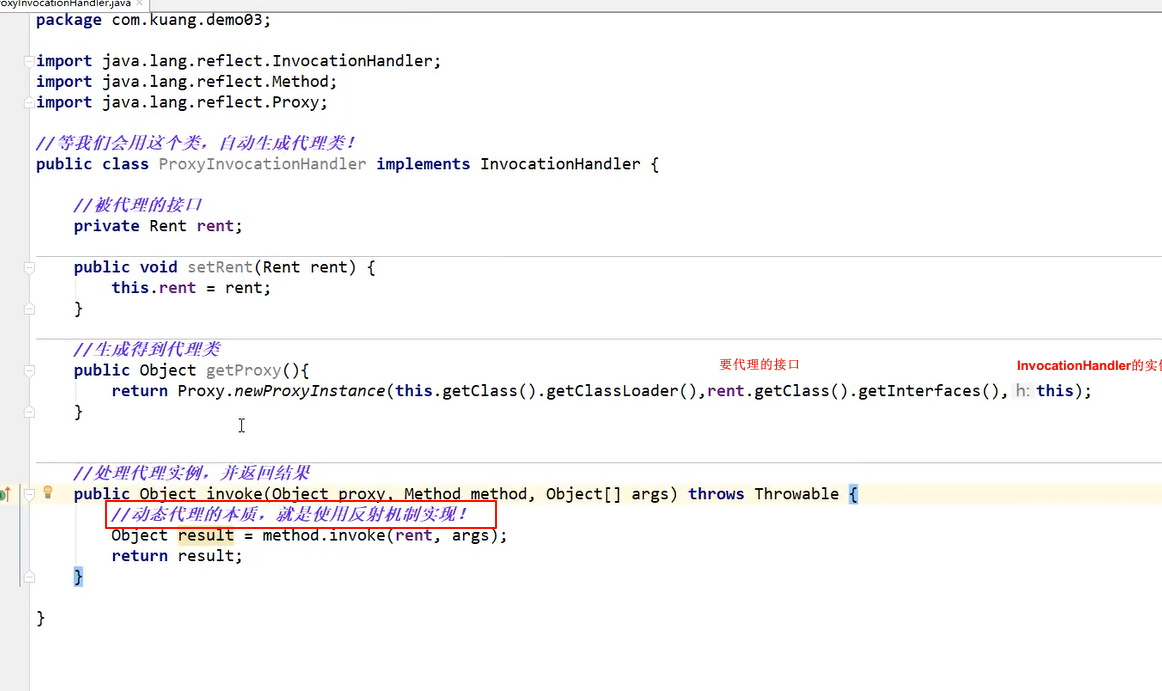
动态代理
https://juejin.cn/post/6844903978342301709#heading-11
InvocationHandler接口
Proxy.newProxyInstance
aop实现的三种方式
1
package com.boogipop.cutface;

import org.springframework.aop.MethodBeforeAdvice;

import java.lang.reflect.Method;

public class Before implements MethodBeforeAdvice {
    @Override
    public void before(Method method, Object[] args, Object target) throws Throwable {
        System.out.println("Before");
    }
}
package com.boogipop.cutface;
import org.springframework.aop.AfterReturningAdvice;
import java.lang.reflect.Method;
public class After implements AfterReturningAdvice {
@Override
public void afterReturning(Object returnValue, Method method, Object[] args, Object target) throws Throwable {
System.out.println("After");
}
}<?xml version="1.0" encoding="UTF-8"?>
<beans xmlns="http://www.springframework.org/schema/beans"
xmlns:p="http://www.springframework.org/schema/p" xmlns:xsi="http://www.w3.org/2001/XMLSchema-instance"
xmlns:context="http://www.springframework.org/schema/context"
xmlns:aop="http://www.springframework.org/schema/aop"
xsi:schemaLocation="http://www.springframework.org/schema/beans
http://www.springframework.org/schema/beans/spring-beans-4.1.xsd
http://www.springframework.org/schema/context
http://www.springframework.org/schema/context/spring-context-4.1.xsd
http://www.springframework.org/schema/aop http://www.springframework.org/schema/aop/spring-aop-4.1.xsd">
<bean id="after" class="com.boogipop.cutface.After"/>
<bean id="before" class="com.boogipop.cutface.Before"/>
<bean id="simple" class="com.boogipop.service.SimpleImpl"/>
<!--开始配置aop-->
<aop:config>
<!--定义切入点-->
<!-- 执行环绕增加 -->
<aop:pointcut id="point" expression="execution(* com.boogipop.service.SimpleImpl.*(..))"/>
<aop:advisor advice-ref="before" pointcut-ref="point"/>
<aop:advisor advice-ref="after" pointcut-ref="point"/>
</aop:config>
</beans>关于切点的表达式
https://blog.csdn.net/ABCD898989/article/details/50809321
https://blog.csdn.net/loongshawn/article/details/72303040
2 自定义切面类
package com.boogipop.cutface;

public class Selfcut {
    public void after(){
        System.out.println("self after");
    }
    public void before(){
        System.out.println("self before");
    }
}
<?xml version="1.0" encoding="UTF-8"?>
<beans xmlns="http://www.springframework.org/schema/beans"
xmlns:p="http://www.springframework.org/schema/p" xmlns:xsi="http://www.w3.org/2001/XMLSchema-instance"
xmlns:context="http://www.springframework.org/schema/context"
xmlns:aop="http://www.springframework.org/schema/aop"
xsi:schemaLocation="http://www.springframework.org/schema/beans
http://www.springframework.org/schema/beans/spring-beans-4.1.xsd
http://www.springframework.org/schema/context
http://www.springframework.org/schema/context/spring-context-4.1.xsd
http://www.springframework.org/schema/aop http://www.springframework.org/schema/aop/spring-aop-4.1.xsd">
<bean id="after" class="com.boogipop.cutface.After"/>
<bean id="before" class="com.boogipop.cutface.Before"/>
<bean id="simple" class="com.boogipop.service.SimpleImpl"/>
<bean id="selfcut" class="com.boogipop.cutface.Selfcut"/>
<!--开始配置aop-->
<aop:config>
<!--引入selfcut作为切面类-->
<aop:aspect ref="selfcut">
<!--定义切入点-->
<aop:pointcut id="point" expression="execution(* com.boogipop.service.SimpleImpl.*(..))"/>
<!--定义通知,引入切点-->
<aop:after method="after" pointcut-ref="point"/>
<aop:before method="before" pointcut-ref="point"/>
</aop:aspect>
</aop:config>
</beans>注解实现
<dependency>
          <groupId>org.aspectj</groupId>
          <artifactId>aspectjweaver</artifactId>
          <version>1.9.19</version>
      </dependency>
<?xml version="1.0" encoding="UTF-8"?>
<beans xmlns="http://www.springframework.org/schema/beans"
xmlns:p="http://www.springframework.org/schema/p" xmlns:xsi="http://www.w3.org/2001/XMLSchema-instance"
xmlns:context="http://www.springframework.org/schema/context"
xmlns:aop="http://www.springframework.org/schema/aop"
xsi:schemaLocation="http://www.springframework.org/schema/beans
http://www.springframework.org/schema/beans/spring-beans-4.1.xsd
http://www.springframework.org/schema/context
http://www.springframework.org/schema/context/spring-context-4.1.xsd
http://www.springframework.org/schema/aop http://www.springframework.org/schema/aop/spring-aop-4.1.xsd">
<bean id="simple" class="com.boogipop.service.SimpleImpl"/>
<!-- 需要注册bean -->
<bean id="selfcut" class="com.boogipop.cutface.Selfcut"/>
<!-- 开启注解扫描 -->
<aop:aspectj-autoproxy/>
</beans>package com.boogipop.cutface;
import org.aspectj.lang.JoinPoint;
import org.aspectj.lang.ProceedingJoinPoint;
import org.aspectj.lang.annotation.*;
import org.aspectj.lang.annotation.After;
import org.aspectj.lang.annotation.Before;
//定义切面类
@Aspect
public class Selfcut {
@Before("execution(* com.boogipop.service.SimpleImpl.*(..))")
public void before(){
System.out.println("===self before===");
}
@After("execution(* com.boogipop.service.SimpleImpl.*(..))")
public void after(){
System.out.println("===self after===");
}
@Around("execution(* com.boogipop.service.SimpleImpl.*(..))")
public void around(ProceedingJoinPoint jp) throws Throwable {
System.out.println("环绕前");
// 执行切入点的方法
Object proceed = jp.proceed();
System.out.println("环绕后");
// 获取签名
System.out.println(jp.getSignature());
}
@AfterReturning("execution(* com.boogipop.service.SimpleImpl.*(..))")
public void afterreturn(){
System.out.println("after return");
}
}顺序为环绕前->执行前->方法执行->返回后通知->执行后->环绕执行后(这里是spring6的顺序,spring5貌似不一样,不过问题不大